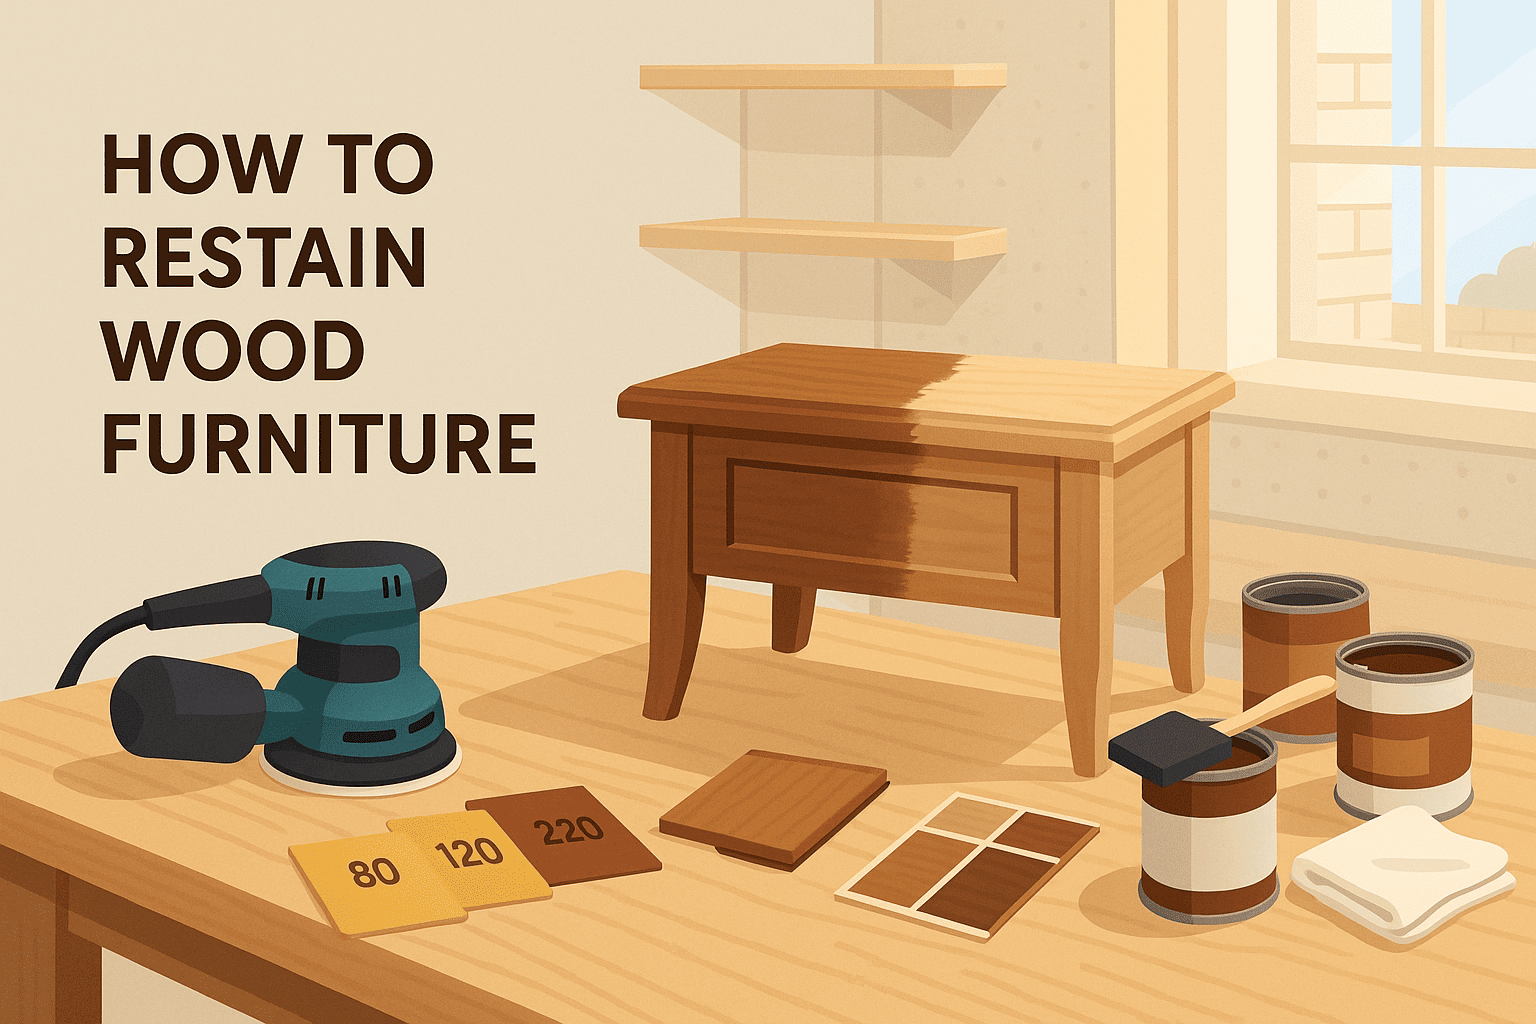
Refinishing old wood furniture is one of the most effective ways to give your home a fresh look without incurring significant expenses. Instead of throwing away worn-out pieces, you can bring them back to life with a few tools, some time, and the right stain.
More people today are choosing to reupholster furniture themselves. It is an affordable and creative way to update your space while preserving items of sentimental value. Plus, doing it yourself gives you full control over the final look.
In this guide, you will learn how to restain wood furniture from start to finish. We will walk you through each step, share helpful tips, and make sure you avoid common mistakes. Whether you are a first-timer or just need a refresher, this guide will help you get great results.
لماذا يعد إعادة الصبغ بديلاً ذكيًا للاستبدال
Restaining wood furniture is a smart choice for many reasons. First, it saves money. Buying new furniture can be expensive, but maintaining it costs much less. All you need are a few supplies and a little time.
Second, it is better for the environment. By refinishing what you already own, you keep old furniture out of landfills. This helps reduce waste and supports a more sustainable lifestyle.
Lastly, restaining gives you more control over the final look. You can choose the exact colour and finish you want. Whether you prefer a modern tone or a rustic look, you can make the piece your own. Restaining also works well on vintage or damaged items that still have a strong frame underneath.
To get the best results, make sure you use the right tools. Power sanders, in particular, help smooth surfaces quickly and evenly, which is key to a clean finish.
مقارنة التكلفة: إعادة التشطيب بنفسك مقابل إعادة التشطيب الاحترافي
Choosing between doing it yourself and hiring a professional often comes down to value and flexibility. DIY refinishing is often more affordable and gives you full control over the process. With just a few tools and materials, you can refresh your furniture and feel proud of the result.
Professional refinishing can deliver high-quality results but often comes at a much higher cost. It also limits your input on timing, materials, and style. While it may save time, it does not always offer the same personal satisfaction.
| Feature | DIY Refinishing | Professional Refinishing |
|---|---|---|
| Cost Range | Lower overall cost | Higher upfront cost |
| Time Investment | Work at your own pace | Depends on contractor availability |
| Effort Required | Hands-on, step-by-step process | No personal effort involved |
| Control Over Outcome | Full control of color, finish, and materials | Limited customization options |
| Tool Use | One-time setup with reusable tools | Tools handled by the contractor |
| Personal Satisfaction | High, with a rewarding learning experience | Polished result, but less personal connection |
Professional help works for some, but many people enjoy doing it themselves. So, with the right tools, restaining becomes a project you can handle with confidence.
الأدوات والمواد التي ستحتاجها
Before you begin restaining, gather all the tools and materials you need. Having everything ready will make the process smoother and faster.
Start with the basics. You will need sandpaper in different grit levels, a clean cloth, a wood stain, and a sealant. Choose a stain that suits your furniture and the final look you want. A good sealant helps protect the surface and makes it last longer.
For better results, consider using power tools. A reliable sander makes it easier to smooth the surface quickly and evenly. Dust control tools also help keep your work area clean and safe. These items are helpful for both beginners and more experienced DIYers.
Wearing gloves and a dust mask is also important. They protect your hands and lungs while you work. With the right tools and materials, you will be ready to start your restaining project with confidence.
كيفية استعادة لون الأثاث الخشبي؟
Restaining wood furniture is easier than you might think. With a little patience and the right tools, you can completely change the look of an old piece. This section will guide you through each step from start to finish.
- Start by cleaning the furniture. Use a mild cleaner or warm soapy water to remove dirt, grease, and dust. Let the surface dry completely before moving to the next step.
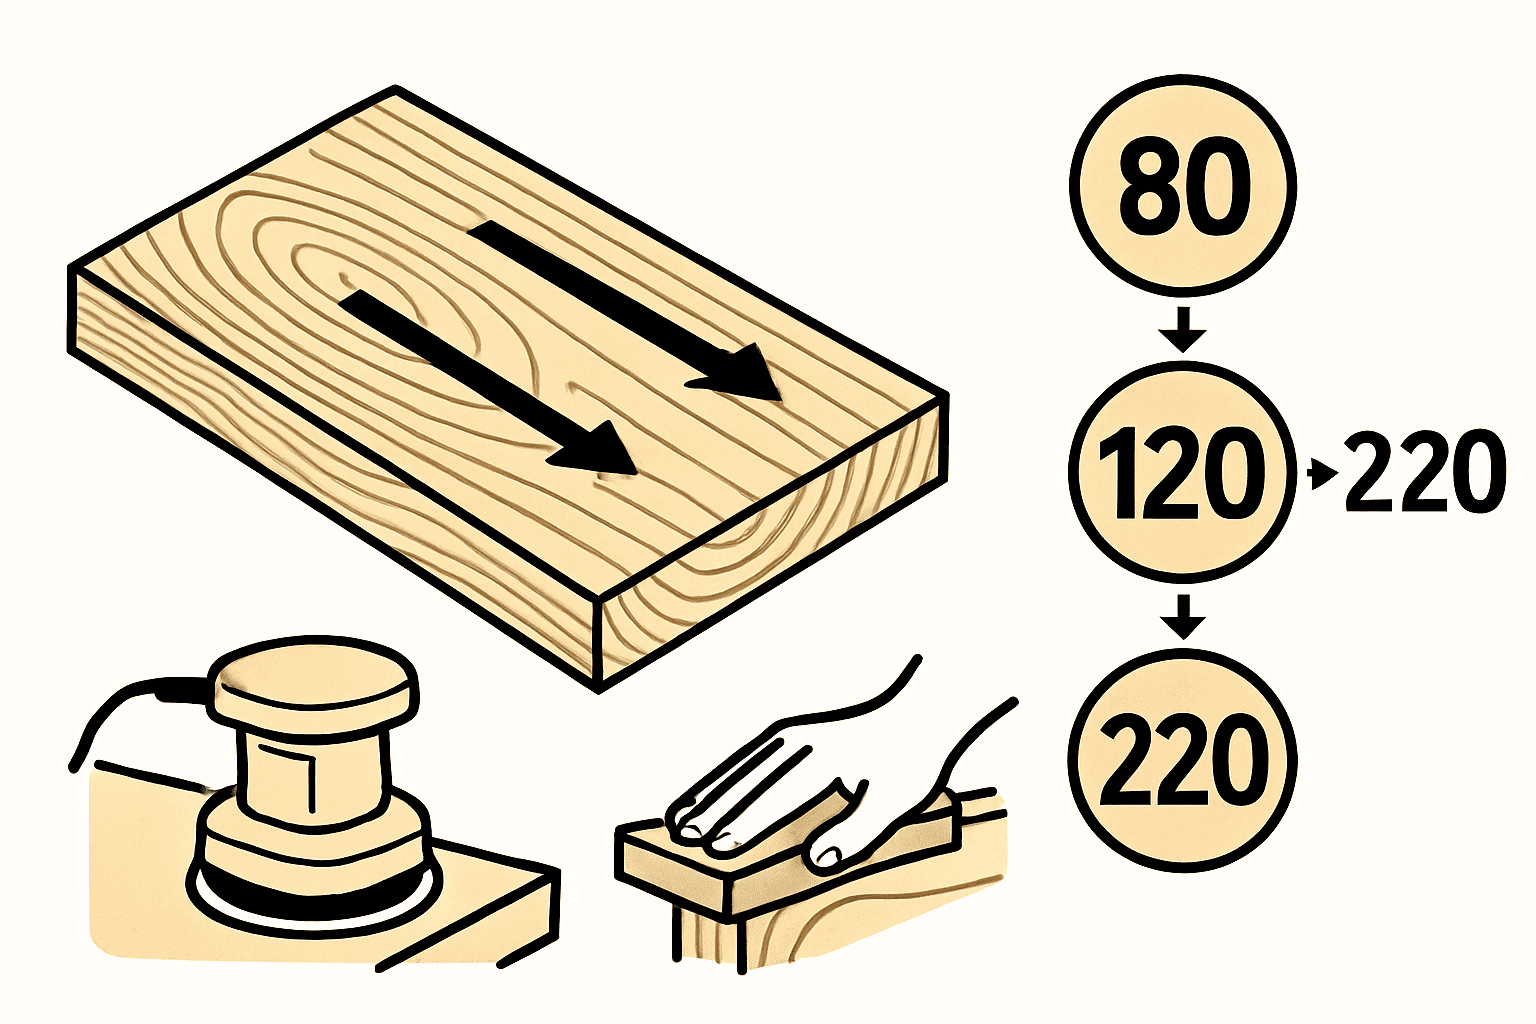
- Next, sand the furniture to remove the old finish. Use medium-grit sandpaper first, then follow with a finer grit to smooth the surface. If you are using an orbital sander, keep your strokes even and steady.
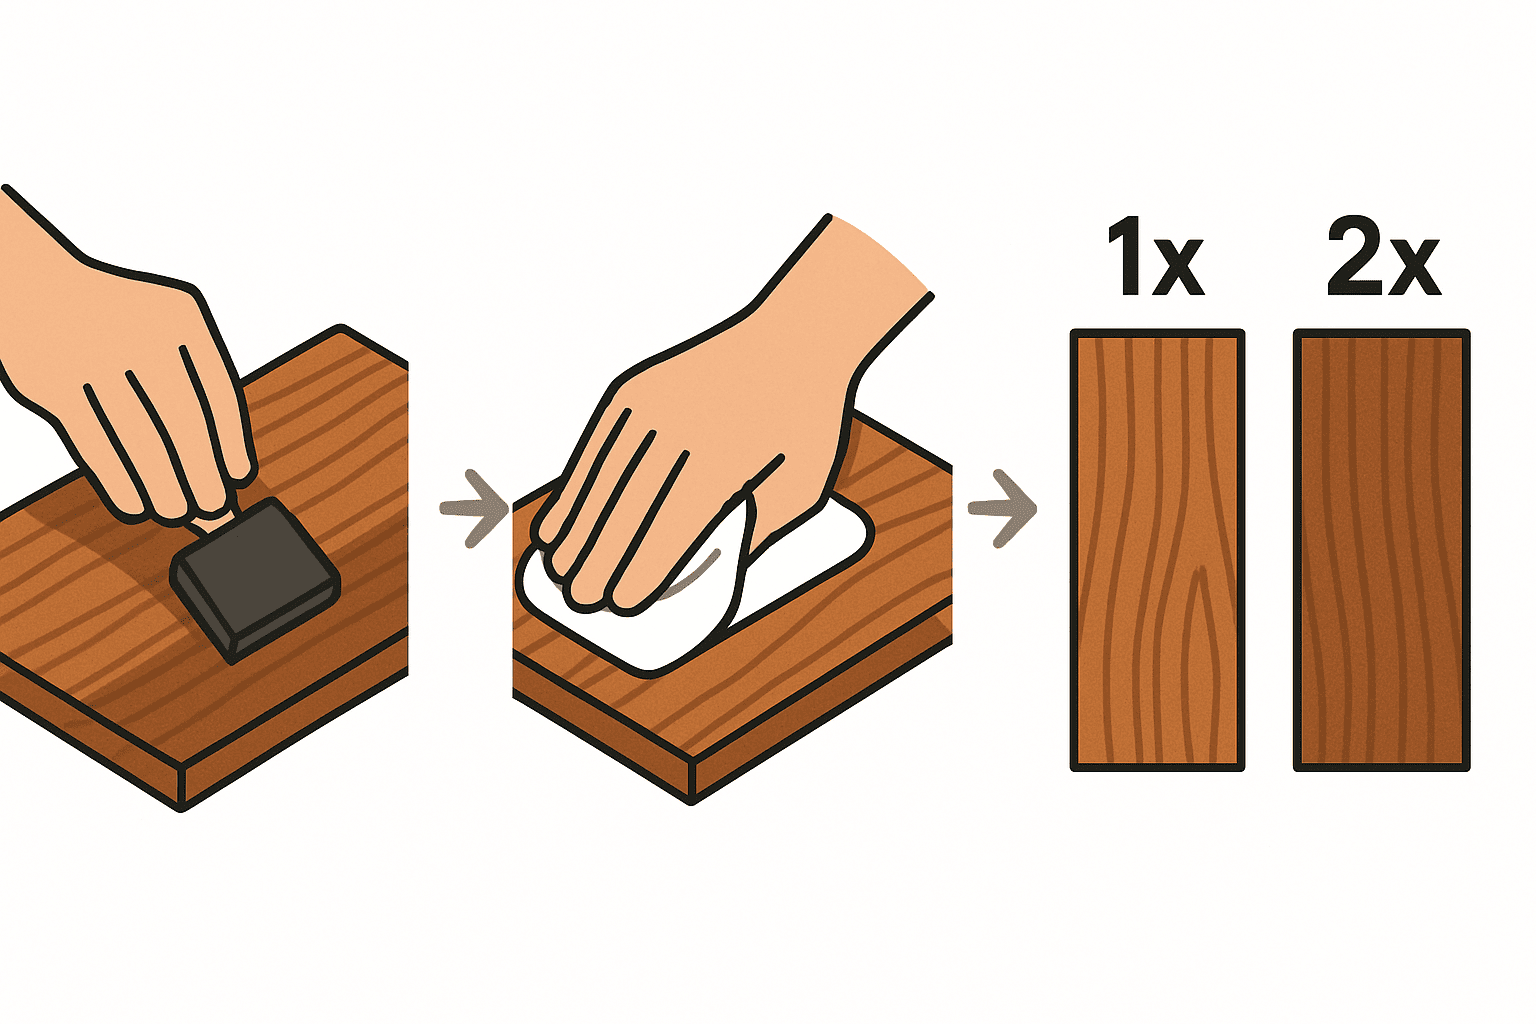
- After sanding, wipe away all dust with a tack cloth or a damp rag. Then, apply your chosen stain using a clean brush, sponge, or cloth. Work in the direction of the wood grain and apply thin coats for a more even finish. You can always add a second coat if you want a darker look.
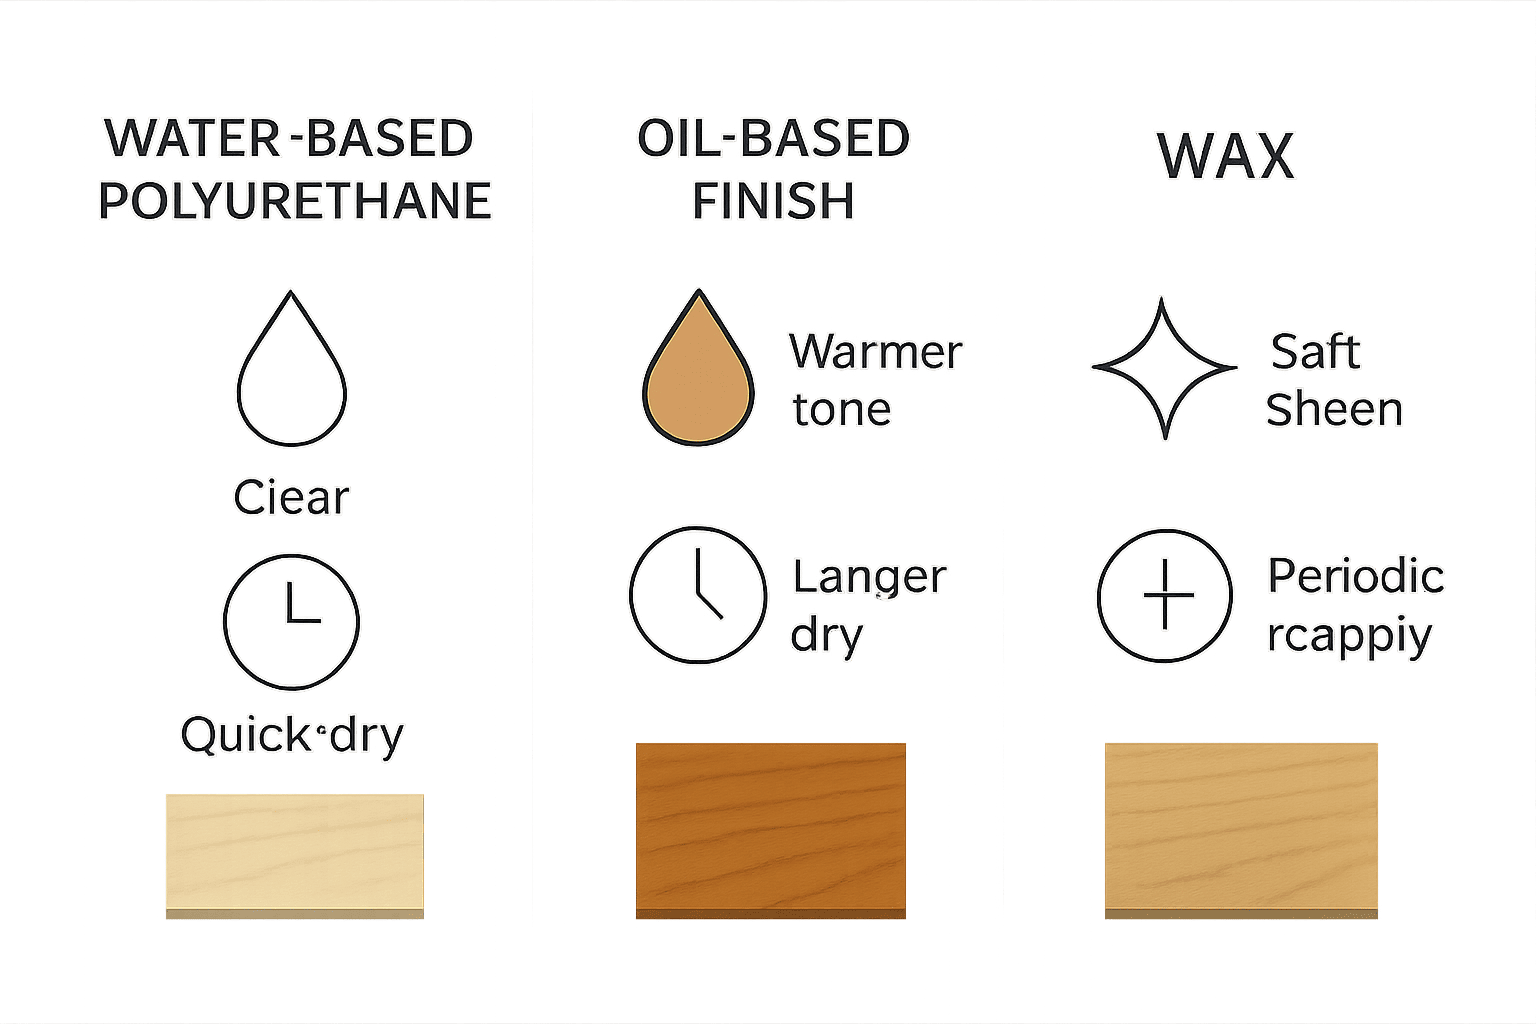
- Finally, seal the wood to protect the new stain. You can use a water-based polyurethane, oil finish, or furniture wax, depending on your preference. Make sure the stain is completely dry before applying the sealant.
Once sealed and dry, your furniture will look refreshed and ready to use. Taking your time with each step will give you the best results.
الخطوة 1: صقل السطح حتى يصبح ناعمًا
Sanding is one of the most important steps when restaining wood furniture. It removes the old finish and opens the wood so it can absorb the new stain properly.
Start with medium-grit sandpaper, such as 120 grit. This helps remove the old coating and smooth out any rough areas. If the surface has a thick or glossy finish, you may need to begin with a lower grit, like 80. Once most of the old finish is gone, switch to a finer grit such as 220 to smooth the wood completely.
Always sand in the direction of the wood grain. This helps prevent scratches and gives you a cleaner look. If you are working with large or flat surfaces, an orbital sander can make the job faster and more even.
After sanding, use a vacuum or a soft cloth to remove all dust. A clean surface is essential before you move on to staining. Skipping this step can lead to blotchy results, so take your time and make sure the wood is smooth and dust-free.
الخطوة 2: تطبيق الصبغة بالتساوي
Now that your furniture is clean and sanded, it is time to apply the stain. This step brings out the natural beauty of the wood and gives your piece a fresh look.
Start by choosing the right stain colour. If you want a classic look, go with a tone that matches the original finish. For a modern style, try a darker shade. To lighten the wood, use a stain with less pigment or one labeled as “natural” أو “clear.” Always test the stain on a hidden spot or scrap piece of wood before you apply it to the entire surface.
Apply the stain with a clean cloth, sponge, or brush. Move in the same direction as the wood grain and work in small sections. Wipe off any extra stain right away to prevent streaks. If you want a deeper colour, wait for the first coat to dry, then apply a second coat.
Let the stain dry fully before sealing the piece. Drying time can vary, so check the label on your stain for exact details. Taking your time during this step helps make sure the finish looks smooth and even.
الخطوة 3: إغلاق النهاية للحصول على نتائج طويلة الأمد
Sealing your stained furniture is the final step. It protects the surface from scratches, moisture, and daily wear. Without a sealant, your hard work can fade or become damaged over time.
There are a few common types of sealants. Water-based polyurethane dries quickly and gives a clear finish. Oil-based options take longer to dry but often provide a richer tone. Wax can add a soft shine and is easy to apply, though it may need to be reapplied more often.
Use a clean brush or cloth to apply the sealant in thin, even coats. Follow the direction of the wood grain to avoid streaks. Allow the first coat to dry fully, then lightly sand the surface with fine-grit sandpaper before applying a second coat. This helps the final layer stick better and feel smoother.
Once the sealant has dried completely, your furniture will be ready for daily use. A strong seal keeps the colour looking fresh and adds years to the life of your piece.
ما هي طريقة تلوين الخشب التي يجب عليك استخدامها؟
When updating wood furniture, it helps to know the different ways to add colour. Each method works a bit differently and gives a different result.
بقع الصبغة
Dye stains soak deep into the wood. They create bright, smooth colors that work well on fine-grained woods like maple or cherry.
- Best for: Rich, even colour
- Keep in mind: They may fade in sunlight
بقع الصبغة
These sit near the surface and highlight the grain. They work well on open-grain woods like oak or ash.
- Best for: Making the wood grain stand out
- Keep in mind: They might blotch on soft woods unless prepped first
بقع الجل
Gel stains are thick and stay mostly on the surface. This makes them a good choice for soft or uneven woods.
- Best for: Smoother, more even coverage on tricky woods
- Keep in mind: They may cover the grain more than other options
أحبار
Toners are sprays that add light colour on top of stained wood. They’re often used to adjust the shade or match two pieces.
- Best for: Fixing patchy areas or fine-tuning colour
- Keep in mind: You need spray tools and a steady hand
اختيار الشخص المناسب
- Use dye for bold colour on smooth wood
- Use pigment stain on oak or ash
- Use gel stain if your wood stains unevenly
- Use toner to match or correct colour
MaxXT tools like orbital sanders and dust extractors help make any of these methods work better. Smooth sanding and clean surfaces lead to more even, lasting colour.
كيف يؤثر نوع الخشب على المظهر النهائي
Different types of wood react to stain in different ways. Some woods absorb stain quickly and evenly, while others may blotch or take on unexpected tones. Knowing what type of wood you are working with can help you choose the right approach.
- Softwoods like pine tend to absorb stain unevenly. This can cause dark patches or streaks if not prepared properly. Using a wood conditioner before staining helps create a more even finish. Pine is a popular choice because it is easy to find and work with, but it does require extra care.
- Hardwoods such as oak, walnut, and cherry usually take stains more evenly. Oak has a strong grain that shows through the stain, giving your furniture a bold and classic look. Walnut and cherry may darken over time, so choose your stain color with that in mind.
هل من المقبول إعادة الصبغة دون الصنفرة؟
Some people wonder if they can skip sanding and go straight to staining. While it is possible in certain cases, it usually does not give the best results. Sanding helps remove the old finish and allows the new stain to soak into the wood more evenly.
If your furniture already has a smooth surface and a light finish, you might be able to apply stain without sanding. However, the stain may not stick well or may wear off quickly. In most cases, sanding creates a clean surface that helps the stain last longer and look more even.
Using the right sanding tools can make the process much easier. An orbital sander helps cover larger areas quickly and evenly. It also reduces the effort needed compared to sanding by hand. Even a light sanding can make a big difference in how the final piece turns out.
For long-lasting results, take the time to sand. It helps your stain look better and stay in place for years to come.
نصائح السلامة لمشاريع التلوين
Working with wood stains can be fun, but safety should always come first. Stains and sealants contain chemicals that can be harmful if used without care. Taking a few simple steps can help keep you safe while you work.
- Always wear a dust mask when sanding. This prevents you from breathing in small wood particles, which can irritate your lungs.
- You should also wear gloves when handling stain or sealant. These products can stick to your skin and may cause reactions if not washed off quickly.
- Make sure your workspace is well-ventilated. Open windows and doors or work outside if possible.
- Stain fumes can be strong and should not be inhaled for long periods. If you are working indoors, take breaks and let the air circulate often.
- Keep all materials like stain-soaked rags and brushes away from heat or direct sunlight. These items can catch fire if left in the wrong place. Dispose of them properly and follow the instructions on the label.
Following these tips will help protect your health and make your project safer from start to finish.
أدوات MaxXT التي تجعل إعادة الصباغة أسهل
Having the right tools can turn a hard project into a smooth one. MaxXT offers equipment that helps you refinish wood furniture more easily and with better results.
صنفرة مدارية
أ صنفرة مدارية is one of the best tools for this kind of job. It helps remove old stains and smooth out rough spots much faster than sanding by hand. MaxXT’s range of orbital sanders includes models designed for both beginners and experienced users. These sanders also reduce hand fatigue and give you better control over the surface.
جهاز شفط الغبار
Dust can build up quickly during sanding. That is where a good جهاز شفط الغبار makes a big difference. MaxXT’s vacuum tools help keep your work area clean and your lungs safe. They also help the stain stick better by clearing away fine dust particles.
Using well-designed tools not only saves time but also helps you achieve a cleaner and more even finish. If you are starting a new project or planning to restain more furniture in the future, these tools are worth adding to your setup.
Explore MaxXT’s full collection to find the right tools for your next furniture project.
الأفكار النهائية: اجعل أثاثك يبدو جديدًا مرة أخرى
Restaining wood furniture is one of the easiest ways to give old pieces a brand-new life. It helps you save money, stay creative, and keep items that matter to you. With the right tools and a bit of patience, anyone can get great results.
You do not need to be a professional to do a great job. Each step, from cleaning to sealing, gives you the chance to shape the look and feel of your furniture. That hands-on process makes the final result more meaningful.
If you are planning more home projects, consider adding high-quality tools to your collection. They help improve your results and make the work feel easier. With the right tools and knowledge, you can take on many more DIY furniture updates with confidence.
So, are you ready to give your furniture a fresh new look? If yes, grab your tools, pick your stain, and start your next DIY project with confidence. Your perfect finish is just a few steps away.
الأسئلة الشائعة
Q: How do I maintain furniture after restaining?
A: Keep the surface clean by wiping it with a soft, dry cloth. Use coasters to avoid water rings, and reapply polish or wax every few months to protect the finish.
Q: Can I use gel stain instead of regular stain?
A: Yes, gel stain works well on vertical surfaces and woods that absorb stain unevenly. It gives you more control and reduces blotching.
Q: How long should I wait between coats of stain?
A: Most stains need about four to six hours to dry between coats. Always follow the drying time listed on the label for the best results.
Q: Do I need to remove paint before applying stain?
A: Yes. Stain will not soak into painted surfaces. You must strip or sand off the paint completely before restaining.
Q: What is the best temperature for staining wood?
A: Aim to work in temperatures between sixty and eighty degrees Fahrenheit. Low humidity also helps the stain dry more evenly.