Key Takeaways:
- Always follow a gradual grit progression from coarse (40-80 grit) to ultra-fine (800 – 3000).
- Use coarse grit for paint and rust removal, 320-600 for primer prep, and 800+ for final finishing.
- Use manual sanders for better control and power sanders to speed up rust and paint removal.
- Let body filler cure 20-30 minutes before sanding to avoid clogging and uneven surfaces.
- Apply a guide coat between every sanding stage to reveal hidden imperfections.
- Wet sanding (800-3000 grit) creates the smoothest finish before final polishing.
This guide is for DIY auto enthusiasts, body shop technicians, and anyone preparing a vehicle for repainting. You’ll learn the correct tools, grits, and techniques to achieve a professional-quality finish.
What Is Auto Sanding and What Critical Role Does It Play?
Auto sanding prepares vehicle surfaces for painting, including metal, filler and painted surfaces by leveling imperfections and creating the correct texture for paint to adhere properly. If sanding is done with improper tools, incorrect grits, and poor techniques, the metal surface will not support the paint. The result will be visible imperfections, poor paint adhesion, and a botched painting job.
What Auto Body Sanding Tools Are Best When Sanding a Car?
The best auto body sanding tools depend on the surface material, surface size, and the condition of the surface.
Manual Sanding Tools
Sandpaper Blocks
Sandpaper blocks are handheld tools with a flat side to which sandpaper is attached. Sanding blocks for body work come in different sizes and diverse rigidity to accommodate varying surfaces. Very rigid blocks are ideal for long, flat panels, while small sanding blocks are ideal for awkward spaces, such as roof drip rails.
Applicable scenarios
- Smoothing paint, primer and body filler on flat panels such as doors and roofs.
- Preserving sharp body lines and preventing round edges.
- Sanding detailed or delicate areas that require a delicate touch.
- Ensuring even pressure when hand-sanding.
Hand Sanding Pads
Hand sanding pads have a flat area to which sandpaper is attached. Made from materials like foam, rubber, or cord, these tools are more flexible than sanding blocks, allowing them to conform to curved, contoured, or irregular surfaces.
Sanding pads help distribute pressure evenly and minimize the risk of removing too much material.
Applicable scenarios:
- Sanding curved and round areas like fenders
- Sanding detailed spots that rigid sandpaper blocks can’t cover completely.
- Wet sanding between paint or clear coat layers.
When Should You Use Manual Sanding Tools?
Manual sanding tools provide the best control for curves, edges, body lines, and localized damage where power tools risk causing uneven surfaces.
Electric Car Body Sanders
Dual-Action Sanders
A double-action (DA) sander combines the linear back-and-forth action of a belt sander with the circular movements of a disk sander. The double-action motion makes these tools ideal for removing material fast while reducing or eliminating swirl marks. The most advanced models can switch between a “locked” rotation mode for fast cutting and an orbital action for swirl-free finishing. DA sanders come with a variety of sanding discs, making them versatile for different tasks.
Inline (Straight-line) Sanders
Inline sanders, or straight-line sanders, are power tools that work in a back-and-forth motion. They are used in the automotive industry to level filler and remove paint or rust on doors and other large, flat surfaces.
If you need to smooth or remove filler or primer while preserving the flatness of the area, then a straight-line sander is your best choice because it removes material uniformly.
Detail Sanders
Detail sanders usually have small triangular or teardrop-shaped pads necessary to access tight areas and sand detail areas. You need this tool to sand around areas like wheel arches, door edges, or roofrails, where other sanders can’t reach.
Heavy-duty Sanders: Rotary & Belt
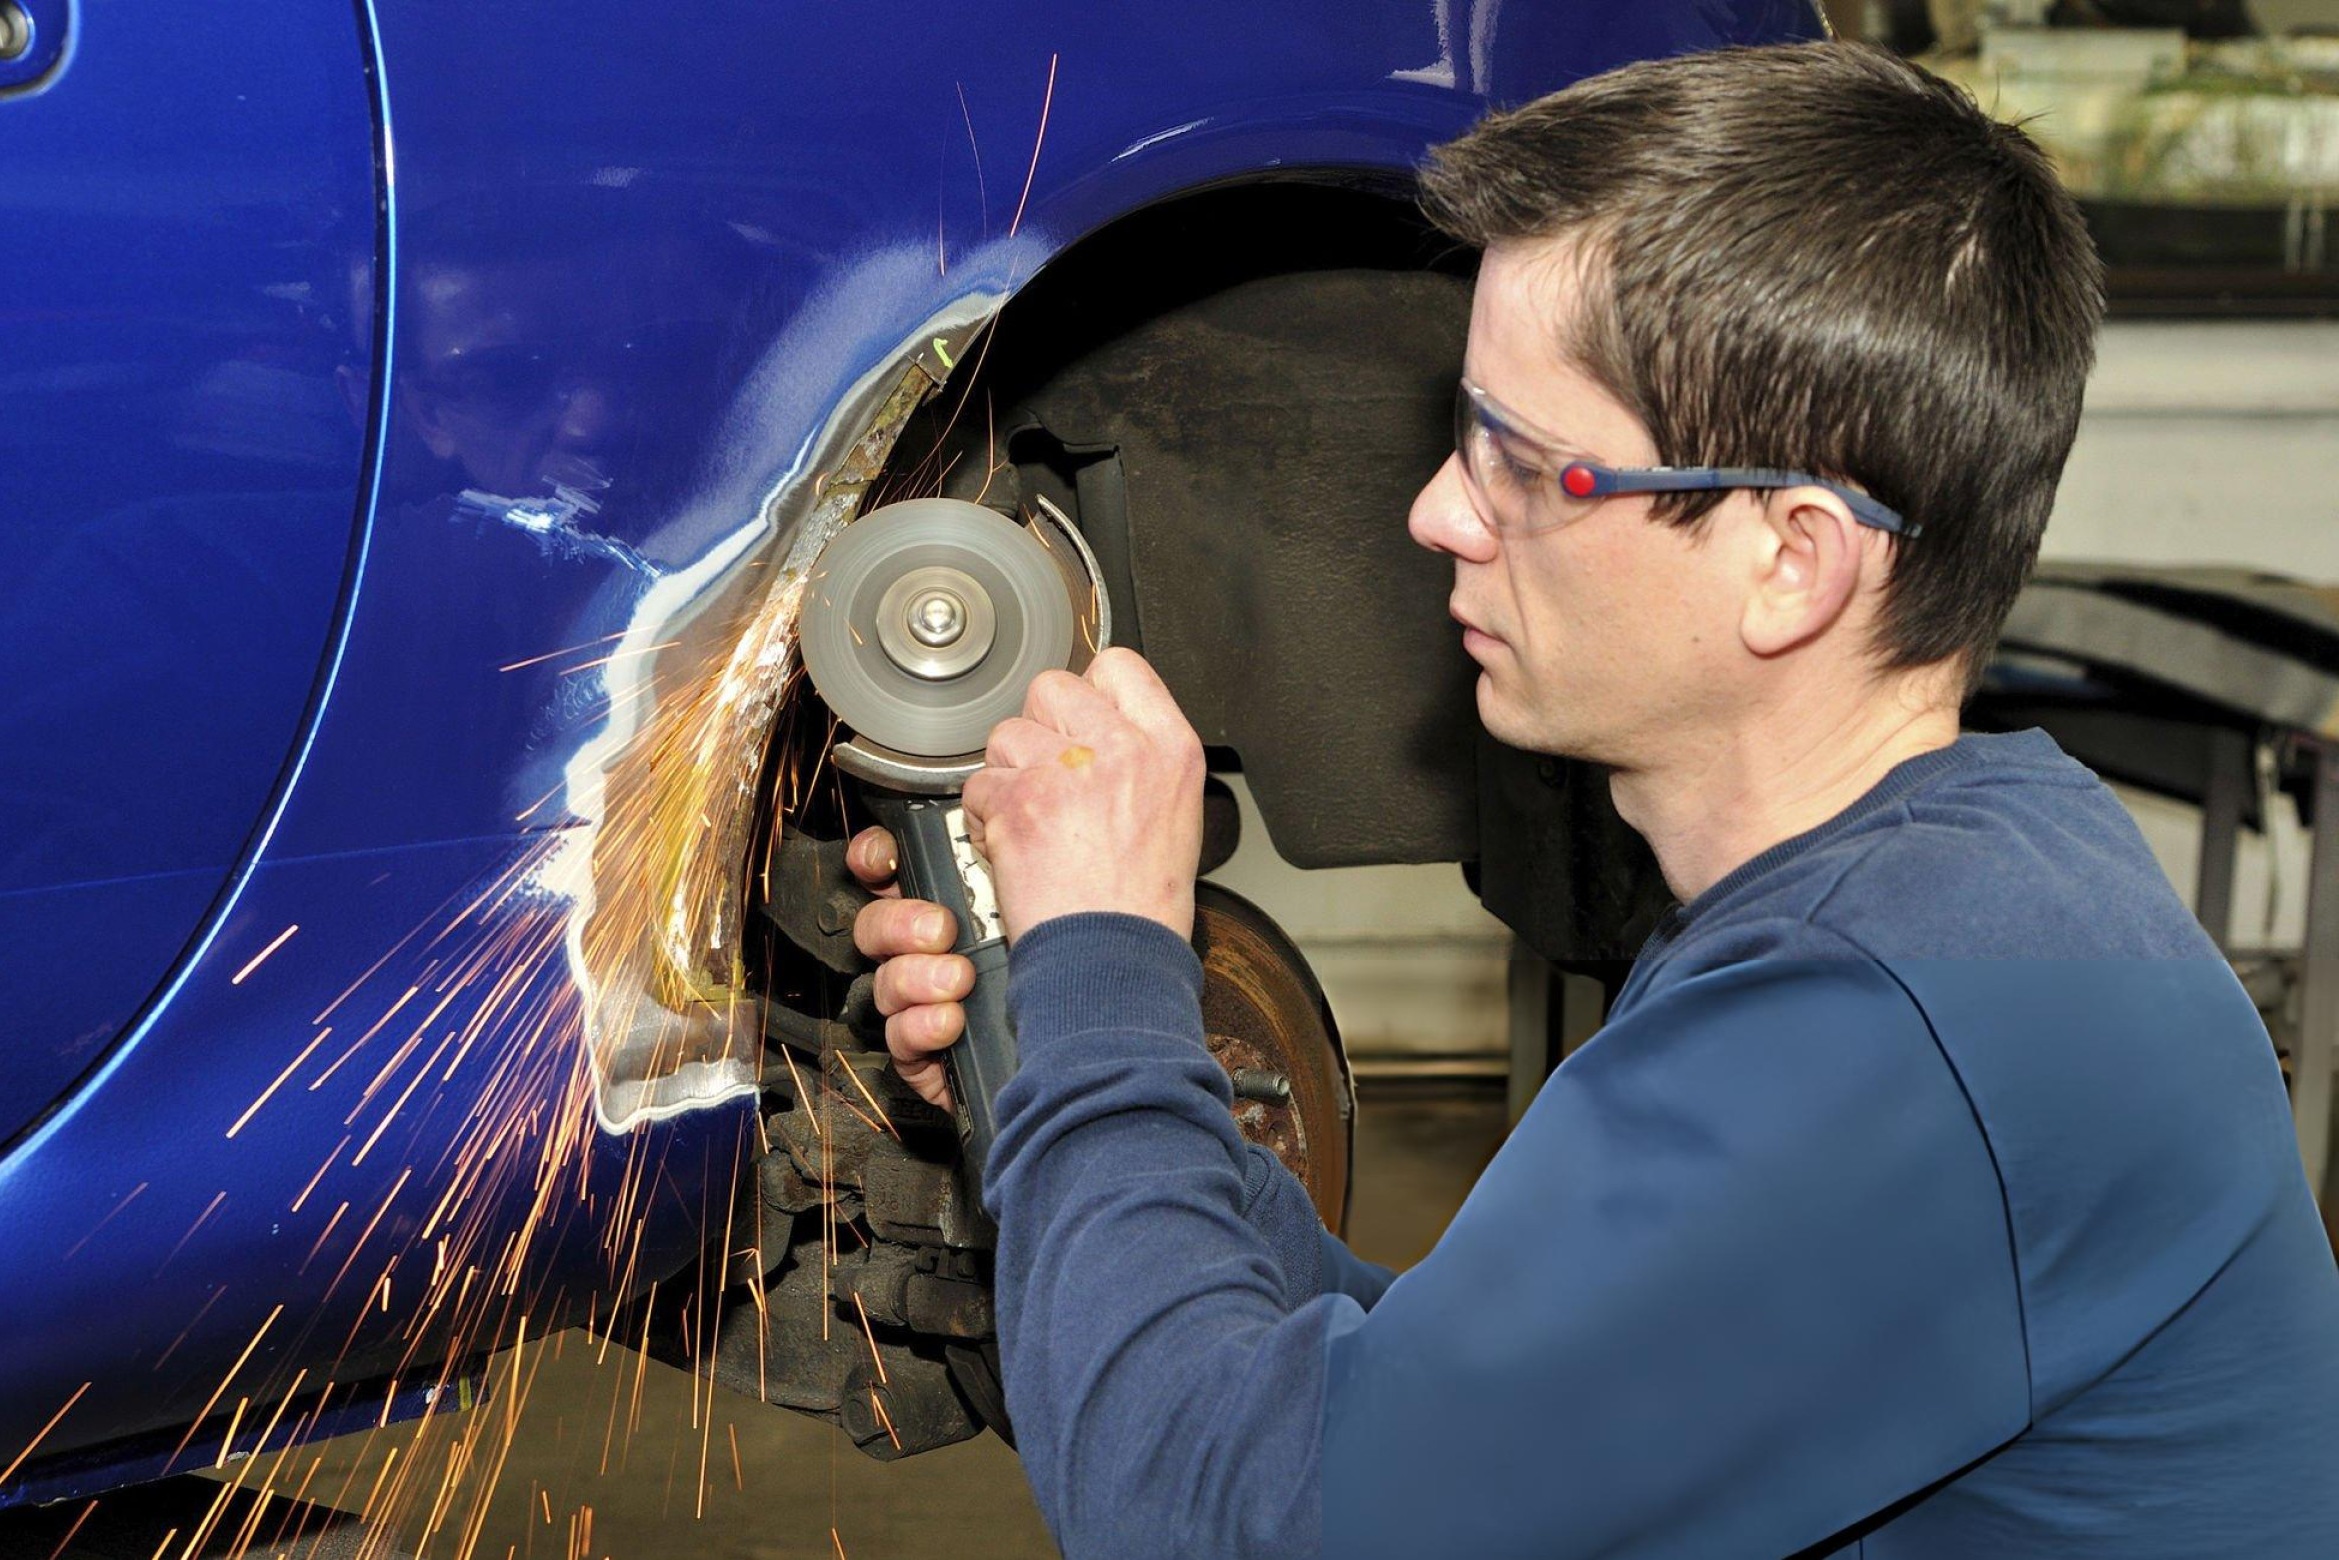
Rotary sanders spin in a circular motion, while belt sanders use a continuous belt over two drums. Both are highly efficient for removing rust, welds, and thick paint layers, but their aggressive cutting action can easily gouge metal if not handled carefully. Use these tools only for heavy material removal and with extreme caution.
Best Car Body Sanders for Common Auto Body Applications
When preparing a car for repainting, one single sander won’t be sufficient to complete the task. The best car body sander will depend on the condition of the body, the size of the repair area, and where you are in the process. For instance, if you are working on a large truck with heavy rust, you’ll benefit from using a belt sander, but if you’re restoring a small sedan, a belt sander may be too aggressive.
Comparing Manual and Electric Sanders
| Tool Type | Best Use Case | Limitations |
| Manual tools | ||
| Sandpaper blocks | Small repairs, edge work, wheel arches, finishing touches, blending filler | Labor-intensive, slower on large panels, difficult to maintain perfectly even pressure |
| Sandpaper pads | Curves, contours, wheel arches, feathering edges | Time-consuming, inconsistent pressure if not used skillfully |
| Electric tools | ||
| Dual-action sander | Prepping paint and primer, blending, finishing large panels | Not effective for removing thick layers of material like paint and rust |
| Inline sander | Leveling filler, flattening doors and quarter panels | Limited use on curves, usually pneumatic |
| Detail sander | Smoothing edges, smoothing and maintaining body lines, smoothing tight or irregular areas | Not effective on large, flat surfaces |
| Belt sander | Removing thick layers of material quickly | Can easily damage metal if not used carefully |
Manual Sanding Tools vs Power Tool Sanders: Which Should You Use?
Manual sanding provides better control for small areas, curves, and edges where power tools risk causing damage. Power sanders speed up work on larger surfaces like hoods, roofs, and doors. Choose based on the repair area size and surface complexity.
When Manual Sanding, What Grit Sandpaper Should You Use?
The correct grit depends on the material you’re sanding: use 36-80 grit for paint/rust removal, 120-220 for filler, 320-600 for primer prep, and 800+ for final finishing. Understanding grit numbers is essential—the lower the number, the coarser the abrasive. If you don’t use the appropriate grit sandpaper for a specific task or material, you can damage the material and end up with visible sanding marks when the repair work is completed.
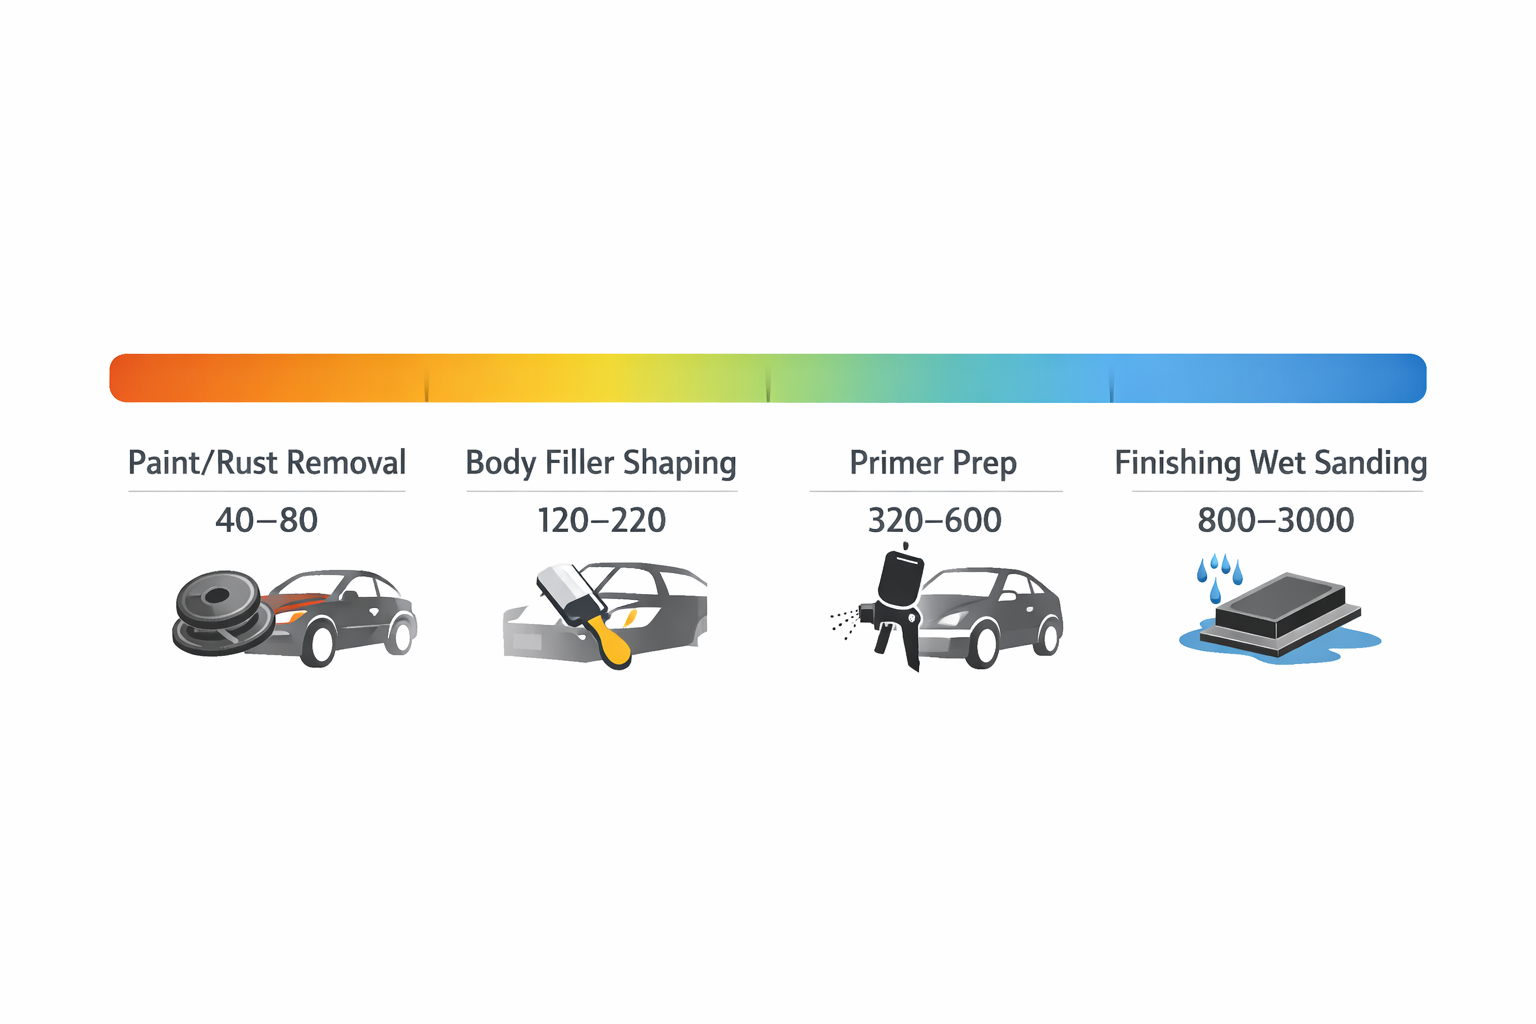
Auto Body Sandpaper Grit Chart
| Grit Range | Purpose |
|---|---|
| Coarse sandpaper 36–80 | Use to remove paint, corrosion, and severe surface damage fast |
| Medium-grit sandpaper 120–220 | Use to smooth filler |
| Fine grit sandpaper
320–600 |
Use for primer and paint prep, removing minor imperfections in preparation for paint |
| Ultra-fine grit sandpaper 800+ | Finishing and blending; eliminating last remaining surface irregularities, such as dust nibs and orange peel |
Wet Sanding vs. Dry Sanding: Which is Better for Sanding a Car?
Dry sanding is better for removing material quickly, while wet sanding creates the smoothest finish before painting. Both methods serve different purposes in the auto body sanding process. Dry sanding is better for removing material quickly, while wet sanding creates the smoothest finish before painting. The table below compares both methods in detail.
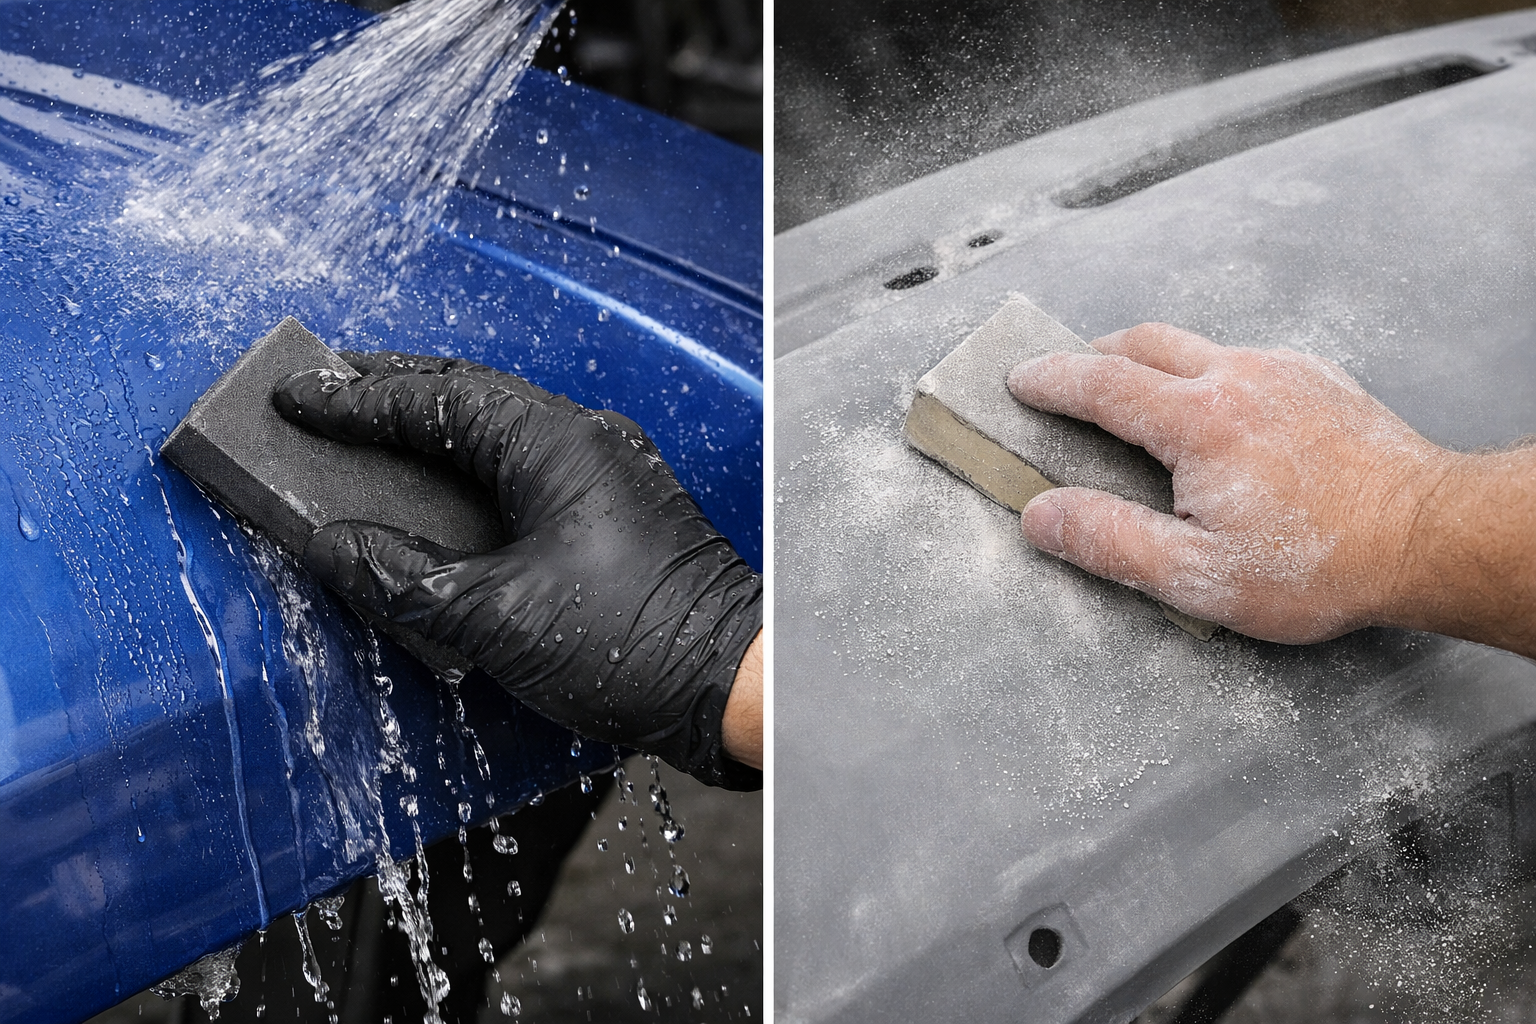
Wet Sanding vs Dry Sanding: Key Differences
| Aspect | Wet Sanding | Dry Sanding |
|---|---|---|
| Description | Wet sanding uses water or other lubricant with a high-grit sandpaper to create a ultra-smooth, glossy surface. | Dry sanding uses abrasive materials such as sandpaper or sanding discs and without lubricants to smooth and refine surfaces. |
| Primary purpose | Used for fine finishing, smoothing paint, and removing light imperfections before polishing. | Used for initial surface preparation, shaping surfaces, removing old paint, and leveling filler. |
| Typical grit range | 800–3000 grit (sometimes higher for final finishing). | 40–600 grit for heavy removal; up to 800 grit for prep work. |
| Surface condition | Best for using on smooth, painted, or primed surfaces that need further refinement. | Best for rough, uneven, or damaged surfaces requiring aggressive material removal. |
| Dust generation | Minimal dust generated, as water traps and removes sanding dust. | High dust generation which is reduced with the use of a vacuum or dust extraction system. |
What Are the Correct Sanding Steps for Painting a Car?
This is how to sand auto paint; follow these five stages: strip old paint (40-80 grit), shape filler (80-220 grit), smooth surface (320-400 grit), sand primer (400-1000 grit), and final wet sanding (1000-1500 grit).
Step 1: Remove Old Paint and Surface Damage
After thorough assessment of the bodywork, start by removing old paint, rust, and other signs of damage. For this purpose, use coarse auto body sandpaper (40–80 grit) and a power tool, like a DA sander or a belt sander to strip old paint, rust, and deep scratches. When using an electric tool, work carefully, and focus on damaged areas rather than sanding an entire area aggressively.
Step 2: Shape and Level Body Filler
After sanding, use filler to repair deep dents, scratches, and gouges. Mix the filler according to the manufacturer’s instructions and use it to create an even surface. Wait for it to cure properly before sanding. Start with 80–120 grit sandpaper to shape the filler, and afterward use a 180–220 grit to refine the surface, blending it into the surrounding area.
Step 3: Smooth the Surface and Apply Guide Coat
Next, move on to a 320–400 grit sandpaper to remove any remaining scratch marks. To identify any low spots, pinholes, and other imperfections, apply guide coat – a fine powder that settles in low spots and scratches, highlighting them clearly.
Step 4: Apply primer and Sand Primer for Paint Readiness
Once you have applied the primer and it has cured, use 400–600 grit dry sanding or 800–1000 grit wet sanding to eliminate any remaining imperfections. Once again spray the area with guide coat to reveal any remaining imperfections.
Step 5: Final Wet Sanding for Paint Application
The final step that ensures a glossy finish with no visible flaws involves wet sanding the primed surface with 1000–1500 grit sandpaper. Consider doing this step manually as it affords you precise pressure control, ensuring a professional-looking finish.
How Do You Sand Different Car Body Parts?
Each body part requires different tools and techniques: use DA sanders with overlapping passes for hoods and roofs, sanding blocks for doors and edges, and flexible pads for curved fenders. Vehicles, in general, consist of different-shaped components, some difficult to reach and not all of them metal, making a car body challenging to sand and paint. Below follows a list of car body parts that pose sanding challenges with tips to handle them.
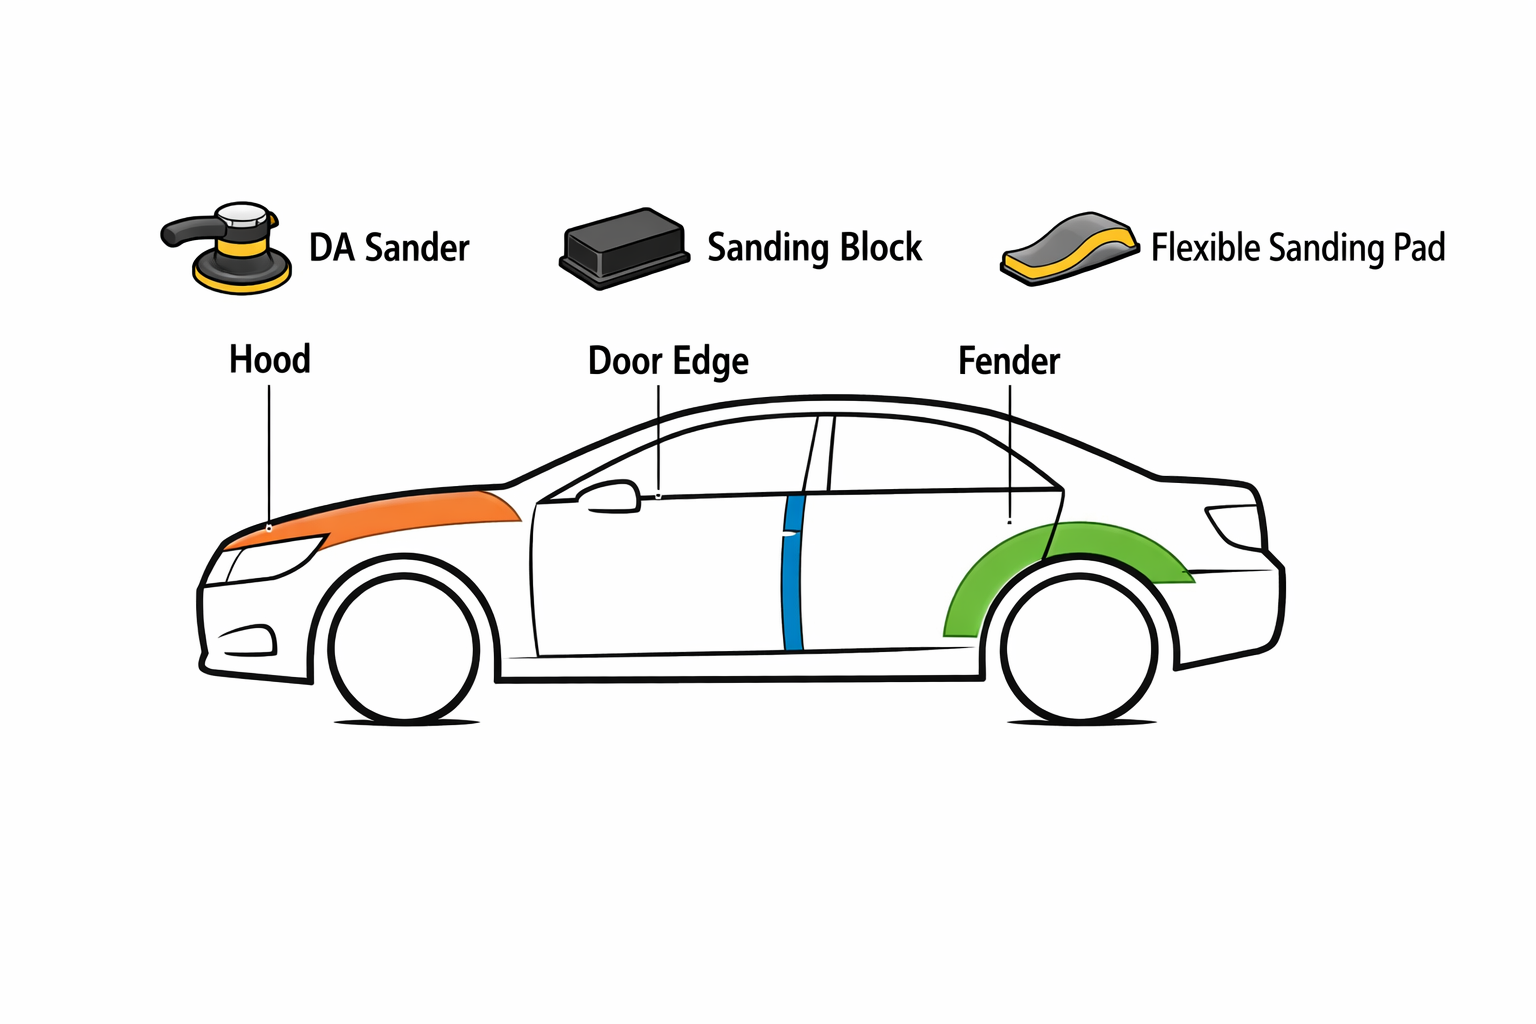
| Body Part | Challenge | Tool Recommendation | Key Tip |
| Hood | Swirl marks on large, flat area | DA sander + sanding block finish | Long-overlapping passes |
| Roof | Large, difficult to reach area | Lightweight DA sander | Work in sections |
| Doors | Flat areas, sharp body lines, and edges | Sandpaper blocks and sandpaper pads | Cross-hatch sanding, avoid sanding through sharp edges |
| Fenders | Complex, curved, and contoured shapes | DA sander,flexible hand pads and small sanding blocks | Long, even strokes following the curve. |
| Quarter Panels | Swirl marks and imperfections stand out | Straight-line or DA sanders | Use a guide coat to highlight uneven areas |
| Bumpers (Plastic) | Heat generation | DA sander, sanding pad for finish | Use proper bumper repair compounds |
| Edges & Body Lines | Risk of burning through paint or primer | Sanding blocks and pads | Fine grit sandpaper and light-pressure |
What Is the Most Important Rule of Auto Sanding?
The most crucial auto sanding rule is to follow a gradual grit progression, starting with a coarse grit and ending with a fine grit. This grit progression is also called the Golden Rule of Sanding. A coarse grit is necessary in the beginning of the sanding process for stripping deep layers of old paint and removing heavy rust. However, coarse grits cause scratches that need to be removed by finer subsequent grits.
Ignoring grit progression or skipping a sanding step is guaranteed to produce a less-than-perfect paint job.
Safety Precautions
Auto sanding generates hazardous airborne particles. Use local exhaust ventilation systems to comply with OSHA standards, and choose sanders with HVLP dust extraction as recommended by NIOSH. Always wear appropriate respiratory protection.
Frequently Asked Questions about Auto Body Sanding
How long does it take to sand a car?
Sanding a car can take anywhere from 3 hours to over 40 hours, with full restoration involving rust removal, body filler, and multiple sanding stages taking the longest.
What grit sandpaper should you use for auto body sanding?
The correct grit depends on the task: 40-120 grit for paint/rust removal and filler shaping, 320-600 for primer prep, and 800+ for final finishing. Always follow a gradual progression from coarse to fine.
Is it better to sand a car wet or dry?
Dry sanding is more efficient for material shaping and removal, and wet sanding is best for producing paint-ready finishes. If you are working with rough surfaces, dry sand them; if you want to smooth paint or primer, wet sanding is your best option.
How long should body filler cure before sanding?
Most body fillers can be sanded after 20–30 minutes, but curing time depends on temperature, humidity, and the filler manufacturer’s instructions. If the filler is soft or tacky, it is not ready to be sanded. Wait longer and always consult the manufacturer’s recommendations.
Conclusion
Proper auto sanding is the foundation for a high-quality paint finish. It requires working with the right auto body sanding tools and applying the correct auto paint sanding steps. Taking note of common automotive sanding mistakes and avoiding them can go a long way to ensuring a professional final finish.
As a professional power tool manufacturer and supplier in China, MaxXT designs and produces reliable car body sanding tools, including a wide range of orbital sanders for consistent performance in demanding workshop environments. We pride ourselves on efficient manufacturing, strict quality control, and competitive pricing.