Can you polish a surface using a tool you already have, such as an orbital sander?
This question comes up often among DIY enthusiasts and professionals alike. Whether working on a car, a wooden table, or a metal fixture, many people wonder if their sander can do more than just smooth out rough spots. Using one tool for multiple jobs saves time, space, and money, but is it really the right move?
In this blog, we break down the facts. You will learn how orbital sanders function when used with polishing pads, the differences between sanding and polishing, and how to match tools to materials. We will also share safety tips, highlight real-world results, and walk you through expert-approved techniques to get the most out of your sander.
Difference Between Orbital Sander and Polishing Orbital Sander
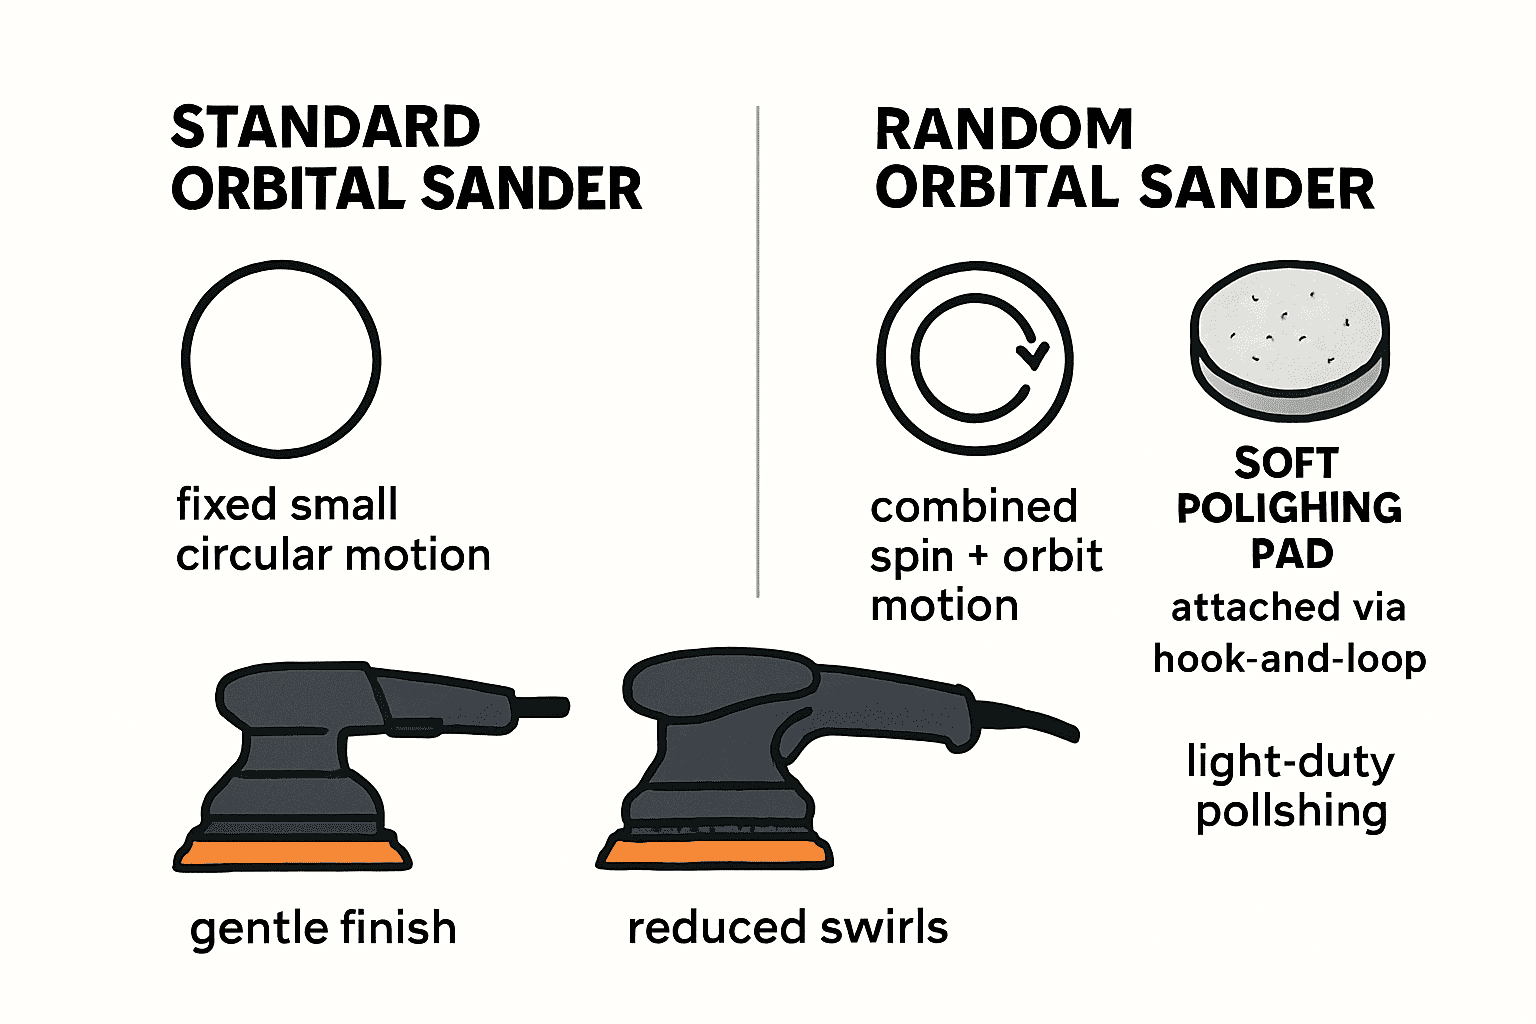
An orbital sander is a power tool used to smooth surfaces like wood, metal, or plastic. It moves the sanding pad in small circles, which helps avoid deep scratches. This motion makes it gentle and ideal for finishing work.
There are two main types: standard orbital sanders and random orbital sanders. A standard orbital sander moves in fixed circles. A random orbital sander combines circular motion with a spinning movement. This reduces swirl marks and gives a cleaner finish, especially on flat surfaces.
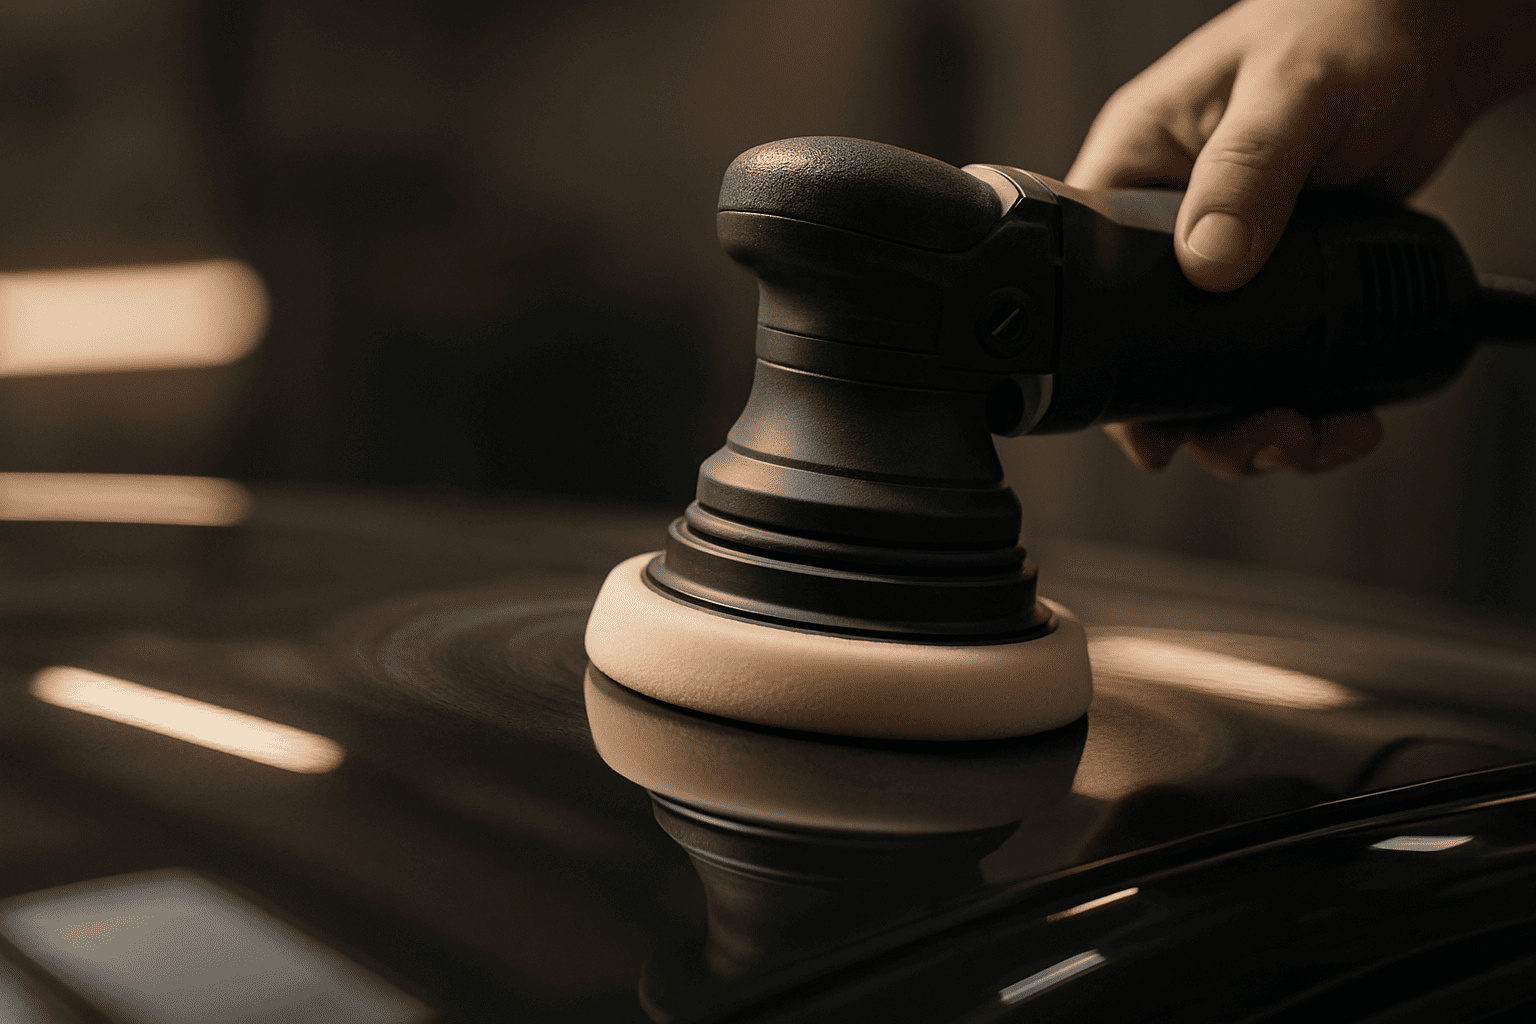
A polishing orbital sander is simply a random orbital sander used with a soft polishing pad instead of sandpaper. When paired correctly, this setup can polish surfaces like car paint or furniture. While it is not as powerful as a dedicated polisher, it works well for light polishing tasks. It gives users the flexibility to switch between sanding and polishing without changing tools.
Buffing, Polishing, and the Limitations
Buffing and polishing serve different goals. Buffing removes light scratches or oxidation with a soft pad and mild compound, refreshing the surface. Polishing enhances shine and smoothness, often as the final step after buffing.
An orbital sander can handle both, but only for light-duty work. It lacks the heat and pressure for deep correction. Heavy scratches or damaged finishes need a dedicated polisher.
Use an orbital sander to restore shine to wood, plastic, or paint. Just know it works slower and offers milder results. For full correction or pro detailing, upgrade to a dedicated tool.
What Top Users Are Saying (Forums, Reviews, DIYers)
Users often say orbital sanders work well for light polishing on car paint and wood. They like the smooth motion and ease of use. With a soft pad and low speed, the tool can refresh dull surfaces and reduce swirl marks.
Still, there are limits. Some find deep scratches remain. Others note that pressing too hard or using the wrong pad leads to uneven results. Polishing also takes longer than with a dedicated tool.
Most agree it is a smart choice for small projects. With the right setup and technique, an orbital sander can do much more than just sanding.
Choosing the Right Polishing Pads for Orbital Sanders
The type of pad you use makes a big difference in how well your polishing job turns out.
There are three main kinds of pads: foam, wool, and microfiber.
- Foam pads come in different levels, ranging from heavy cutting to soft finishing. Use a firmer foam pad to remove light scratches, while softer pads are ideal for bringing out shine on clean surfaces.
- Wool pads are more aggressive and better for tougher jobs. They cut faster but may leave light marks if not used carefully.
- Microfiber pads are a balanced option. They work well for light correction and finishing, especially on smooth surfaces.
When using an orbital sander, make sure the pad attaches securely. Most sanders use a hook-and-loop (Velcro) system. Press the pad evenly onto the backing plate to prevent it from flying off during use.
Choosing the right pad for the task helps you get smoother, cleaner results, whether you are working on wood, paint, or plastic.
Speed and Pressure Settings: What Matters Most
Polishing results depend heavily on speed and pressure. Each material responds differently, so choosing the right combination is key to avoiding damage and getting a clean, even finish.
- For automotive paint, keep the speed low, between 1,500 to 2,000 RPM. Use a soft foam pad and apply very light pressure. Let the pad glide across the surface without forcing it. This protects the clear coat and prevents swirl marks.
- For finished wood, use 1,800 to 2,200 RPM with a microfiber or soft foam pad. Apply gentle, even pressure to enhance gloss without overheating. Avoid staying in one spot to prevent streaks.
- For metal surfaces like chrome or stainless steel, increase speed slightly to 2,000 to 2,500 RPM. Use moderate pressure with a wool or foam pad. Always keep the pad moving in overlapping strokes to avoid dull spots or heat discoloration.
- For plastic parts, keep the speed low, around 1,200 to 1,500 RPM. Use a soft foam pad and apply minimal pressure. Plastic is heat-sensitive, so slow movement and gentle handling are essential.
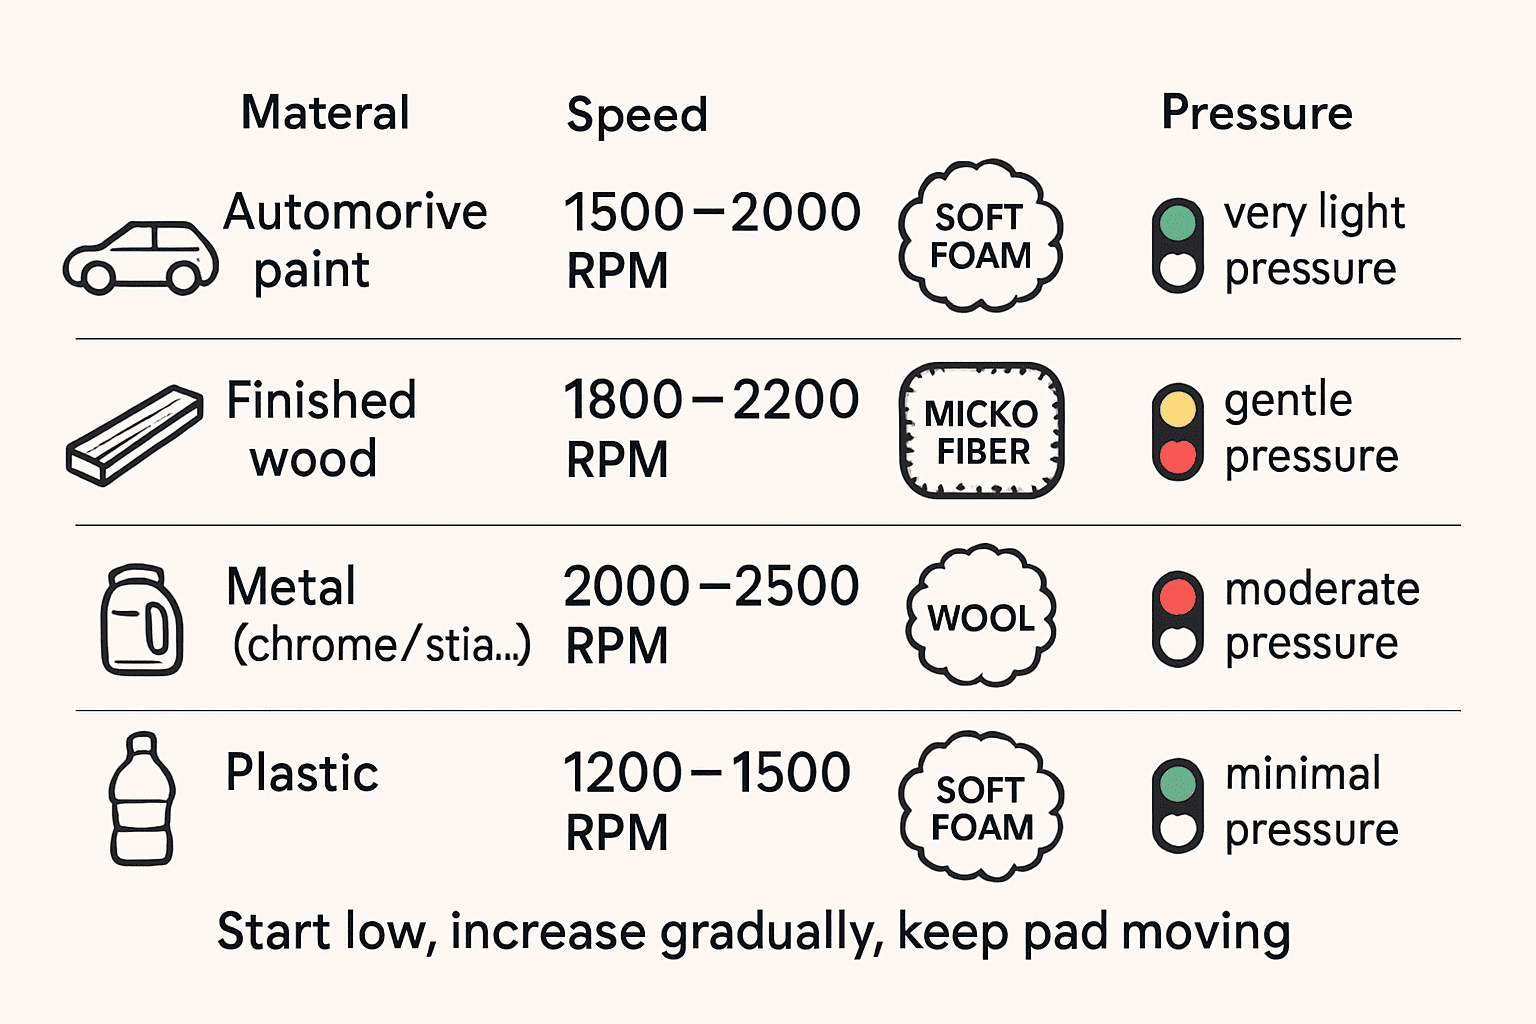
Always start at the lowest speed setting your tool offers and gradually increase if needed. Use just enough pressure to keep the pad in contact with the surface. Do not apply more pressure than necessary. Let the tool and polishing compound do the work. This approach gives you more control, reduces strain on the machine, and delivers a smoother, safer finish.
Polishing Results on Different Surfaces
Surfaces react differently when polished with an orbital sander. Knowing what to expect helps you avoid mistakes.
- For automotive paint, use a soft foam pad at low speed. It adds shine and removes light oxidation, but not deep scratches. Test on a small area first.
- Finished wood responds well to a soft polishing pad. It highlights grain and adds gloss. Avoid polishing raw wood, as it clogs the pad and leaves streaks.
- Metal, like chrome or stainless steel, handles moderate speed and pressure. Use even passes to avoid dull spots.
- Plastic is heat-sensitive. Use the lowest speed, soft pad, and very light pressure to avoid warping.
Each material needs the right combo of speed, pad, and technique.
Step-by-Step Guide: How to Use an Orbital Sander With a Polishing Pad
Using an orbital sander for polishing can be simple if you follow the right steps.
Here’s how to do it properly:
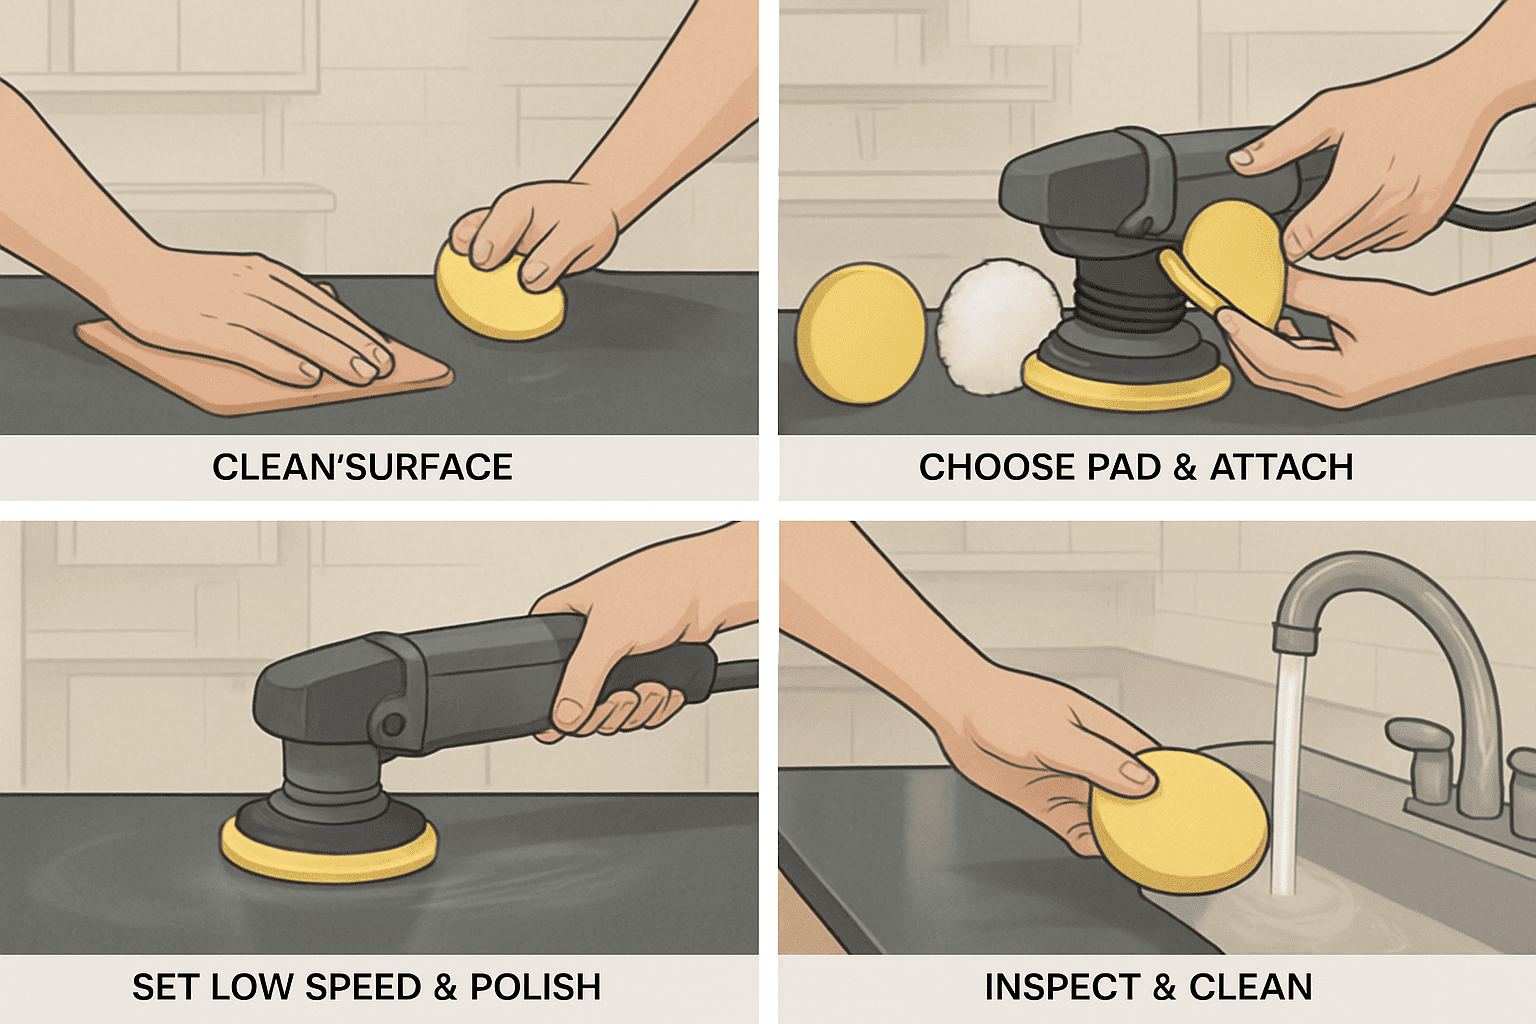
1. Clean The Surface
Wipe away dust, dirt, or grease before you begin. A clean surface helps the pad move smoothly and prevents scratches.
2. Choose The Correct Pad And Product
Select a polishing pad that fits the material, such as foam for paint, microfiber for wood, or soft wool for metals. Dab polish onto the pad or directly onto the surface.
3. Attach The Pad Securely
Make sure the pad sticks firmly to the sander’s backing plate. Use the hook-and-loop system to press it on evenly.
4. Select The Right Speed
Start with a low speed setting to control movement. Increase gradually if needed, but avoid going too fast, especially on heat-sensitive materials.
5. Use Steady Motion
Move the sander in slow, overlapping strokes. Keep the tool flat and apply light pressure. Do not stop in one spot, as it can leave marks.
6. Follow Basic Safety Precautions
Wear goggles, gloves, and a dust mask to protect your eyes, hands, and lungs. Avoid polishing near flammable materials or in areas with high static buildup or heat. Always unplug the tool before changing pads or making adjustments.
7. Inspect And Clean
After polishing, wipe the surface with a clean cloth. Check your results. Rinse the pad with warm water and let it dry before the next use.
8. Maintain Your Equipment
Store the sander in a dry, dust-free area. Clean the vents regularly, check the cord for damage, and ensure all parts move freely. Well-maintained tools last longer and perform better over time.
These simple steps help you polish safely and get even, professional-looking results without damaging the material.
Pros and Cons of Polishing With Orbital Sanders
Using an orbital sander for polishing has both advantages and drawbacks. Knowing these helps you decide when this tool is the right fit.
Pros
Orbital sanders are easy to handle, even for beginners. They create smooth, controlled movements that are safe on most surfaces. These tools are also affordable and often already part of a DIY or workshop setup. With the right pad, you can polish wood, metal, or even car paint without switching machines.
Cons
While convenient, orbital sanders do have limits. They work slowly compared to dedicated polishers. The results may not be as sharp or deep, especially on heavily scratched or faded surfaces. Their lower power also makes them less effective for demanding correction work. If not used properly, they can leave swirl marks or uneven finishes.
Overall, orbital sanders are great for light polishing, routine care, or touch-ups. For high-end detailing or deep correction, a dedicated polishing tool is the better choice.
Market Insights for Retailers and Distributors
Today’s buyers want more from their tools. One machine that handles multiple tasks, such as sanding and polishing, offers clear value. For customers, it means fewer tools to buy and less space needed for storage. For retailers, this shift opens new selling opportunities.
Orbital sanders that double as polishers appeal to a wide range of users. DIYers appreciate the simplicity. Professionals like the flexibility on job sites. Customers are more likely to choose a tool that does more than one job, especially when paired with the right accessories.
Distributors can use this demand to drive sales. Highlight the dual-use feature when marketing. Position polishing pads, compounds, and backing plates as essential add-ons. Selling complete kits or bundles can increase both product value and customer satisfaction.
Multi-purpose tools are no longer just a trend; they are a key part of what today’s shoppers expect.
Business Buyer Tips & Category Highlights
- Professionals need reliable tools built for tough jobs. When selecting an orbital sander for polishing, focus on power, control, and durability.
- Choose models with variable speed settings for better surface protection and precision. Low vibration helps reduce fatigue and improve handling.
- Stick to 5- or 6-inch pads for a good balance of coverage and control. Ensure the tool supports hook-and-loop backing for quick pad swaps.
- Retailers should highlight ergonomic design and include useful accessories. Bundling pads, cases, or dust bags builds trust and appeals to business buyers.
When to Upgrade to a Dedicated Polisher
An orbital sander can handle basic polishing, but it is not built for every task. There comes a point when upgrading to a dedicated polisher becomes the smarter choice.
If you are dealing with deep scratches, faded paint, or heavy oxidation, a rotary or dual-action polisher will give better results. These tools produce more power and heat, allowing for faster correction and a deeper finish. They are also designed to hold up during long, intense use, which most sanders are not made to handle.
A dedicated polisher also offers more control over pad movement and pressure. This is useful when working on curved surfaces or tricky areas where even results matter. If you polish often or need a perfect finish, switching tools will save time and improve quality.
Use an orbital sander for light touch-ups and maintenance. Upgrade to a full polisher when the job demands more power and precision.
Final Thoughts
Polishing with an orbital sander is possible and in many cases, practical. With the right pad, polish, and technique, you can restore shine, remove light marks, and maintain various surfaces using a tool you may already own.
Success comes down to preparation and control. Choose the right accessories, keep your movements steady, and avoid rushing the process. Always match the settings to the surface and use light pressure to protect the material.
Whether you are working on a car, furniture, or metal fixtures, this flexible approach gives you more value from a single tool. Explore more sanding and polishing tips to keep improving your skills and results.
Ready to get started?
Visit our orbital sander category page to find tools and accessories designed for smooth finishes, safe handling, and professional results.
Frequently Asked Questions About Orbital Sander
1. Can I polish a car with a random orbital sander?
Yes, you can. Use a soft foam pad and a light polish. Keep the speed low and apply gentle pressure. This method works well for light swirl removal and adding shine, but it will not fix deep paint defects.
2. What pad is best for polishing wood?
A soft foam or microfiber pad works best on finished wood surfaces. Avoid rough or aggressive pads, especially on untreated wood, as they can leave marks or tear the grain.
3. Can I use wax with an orbital sander?
Yes. Apply a small amount of wax to a finishing pad or directly onto the surface. Use low speed and steady motion to spread it evenly, then wipe off any excess by hand.
4. How do I clean polishing pads after use?
Rinse the pad with warm water and a mild cleaner. Squeeze out the residue and let it air-dry completely. Never store pads while they are wet or dirty.
5. How is a polisher different from a sander?
A polisher is designed to create shine and remove fine defects. It uses smooth, controlled motion with softer pads. A sander removes material using abrasive discs. While both tools can look similar, they serve different purposes.
Using an orbital sander with a polishing pad is just one way to restore shine. To choose the best tools and methods for your project, explore these related guides:
- Choose the right machine polisher type:
Understand the pros and cons of different designs in “Which Machine Polisher Type Is Best?”. - Decide what’s best specifically for your car:
Get car-focused recommendations in “What type of polisher is best for your car?”. - Compare DA and rotary polishers head‑to‑head:
Learn when to use each style in “Dual Action vs. Rotary Polishers”. - Follow a complete car polishing process:
See how all the steps fit together in “How to Polish a Car”. - Prepare the surface properly before polishing:
- Remove old paint safely with “How to Sand Auto Paint”.
- Stop corrosion at the source with “How Do You Fix Rust on a Car”.
These articles will help you choose the ideal tool, prepare the surface correctly, and get consistently professional polishing results.