Have you ever noticed dull spots, swirl marks, or small scratches on your car’s paint? These problems are common, especially if you drive often or wash your car with rough sponges. Over time, your car’s paint can lose its shine and start to look worn out. The good news is, polishing your car at home can help you fix this.
In this guide, you will learn how to polish your car step by step. We’ll cover what tools you need, how to prepare your car, and the correct techniques to use. You’ll also understand when to polish, how long it takes, and how to protect the paint afterward.
Polishing your car by yourself can save you money and help your vehicle look almost new again. You don’t need to be a professional. With the right knowledge and a little practice, anyone can do it.
Let’s begin by understanding why polishing your car is important.
Why Polish Your Car?
Polishing your car is more than just making it look shiny. It has many real benefits that help your car’s paint stay in good condition.
First, polishing removes small scratches, swirl marks, and stains that make your car look old or dirty. It smooths the surface of the paint so light reflects better. As a result, your car looks brighter and newer.
Second, polishing helps protect the paint. Most cars have a clear coat on top of the paint. This layer can get damaged over time from sun, dirt, and washing. Polishing removes a very thin part of this damaged layer and makes the surface smooth again. This helps protect the paint underneath.
It’s also important to understand the difference between polishing and waxing. Polishing corrects the paint by removing defects. Waxing does not fix the paint. It only adds a protective layer on top. So, polishing comes first, and waxing should be done after.
However, polishing does have some risks. If you polish too often or use too much pressure, you can wear down the clear coat. This may cause more damage instead of fixing the paint. That’s why it’s important to use the right tools and polish the car the correct way.
In the next section, we’ll go over the basics of polishing and how it works with your car’s paint.
Understanding Car Polishing Basics
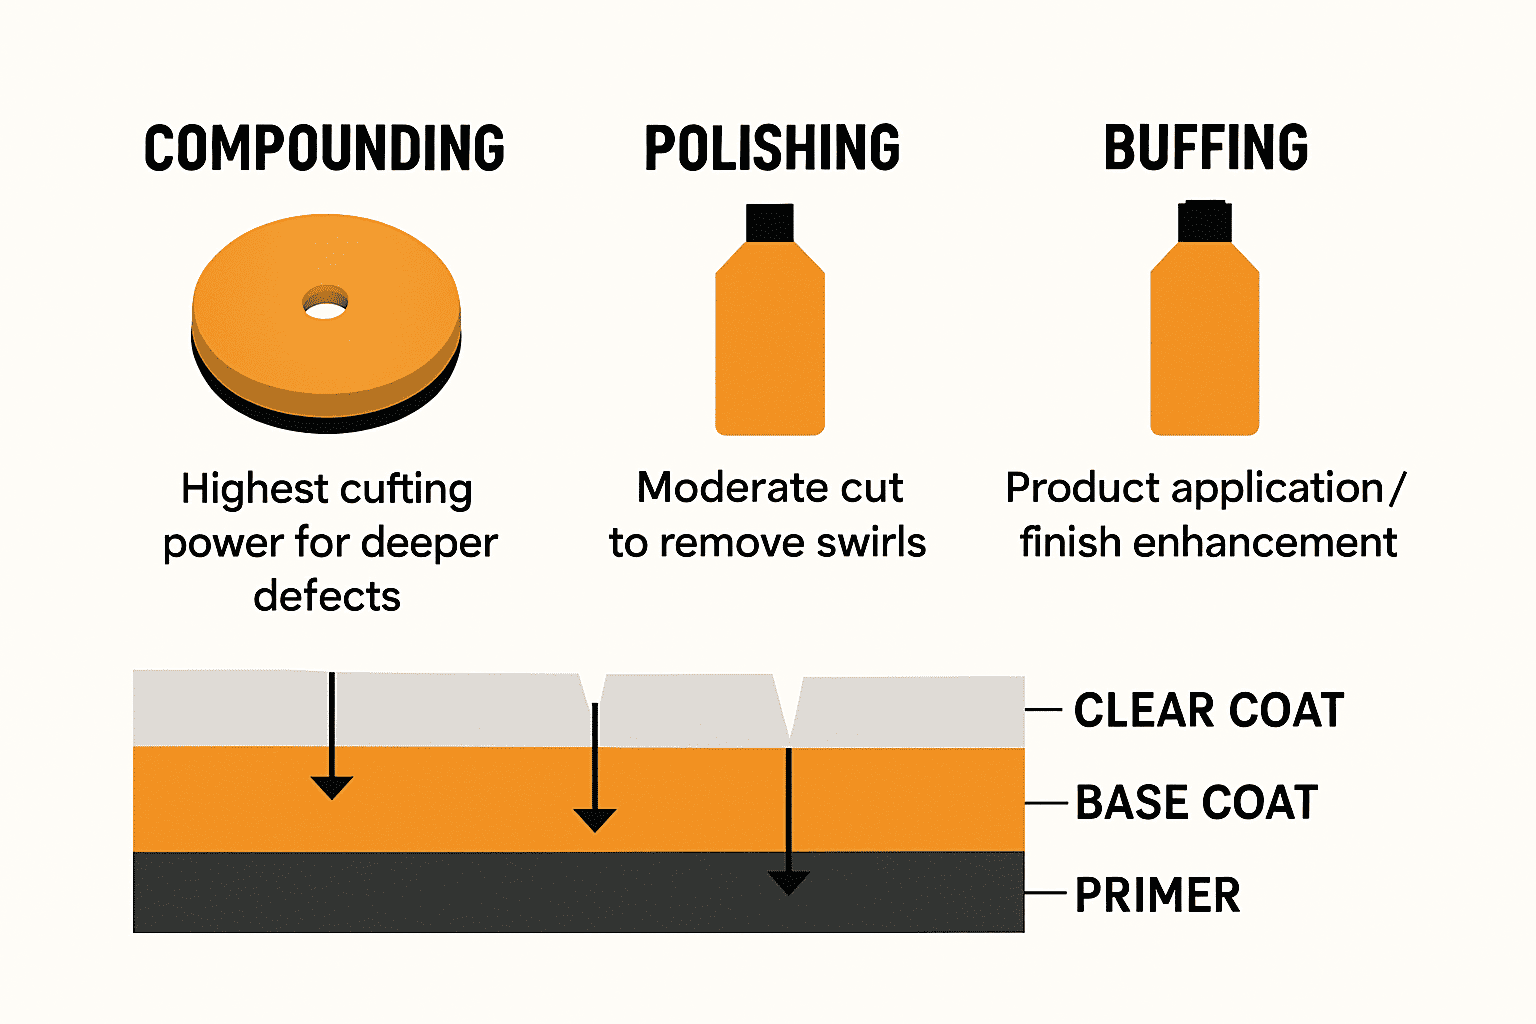
Before you start polishing your car, it’s helpful to understand what polishing really means. Many people mix up polishing, buffing, and compounding, but they are not the same.
Polishing is the process of removing very thin layers of the clear coat to get rid of small scratches, swirl marks, and dull spots. It helps smooth the surface so the paint shines again.
Buffing usually means using a machine with a soft pad to spread polish or wax. People sometimes use the word “buffing” when they really mean “polishing,” but buffing can also be done with wax, which does not remove scratches.
Compounding is a stronger version of polishing. It uses a more abrasive product to fix deeper scratches or heavy oxidation. Compounding removes more of the clear coat than regular polish, so it should be used carefully.
Your car’s paint has three main layers: primer, color (base coat), and clear coat. The clear coat is the top layer that gives the paint its shine and protects it. When you polish your car, you are working on this top layer.
There are also a few risks to keep in mind. If you press too hard or polish too often, you could remove too much of the clear coat. This can lead to uneven paint or damage. Dirty or worn-out pads can also scratch the surface. That’s why it’s important to follow safe techniques, which we’ll cover in later sections.
Special Considerations for Different Paint Types and Colors
Not all car paint behaves the same during polishing. Depending on your car’s paint type and color, you may need to adjust your technique or product choice.
Clear Coat vs. Single-Stage Paint
- Modern cars typically have a clear coat over the base color. These can be polished gently to remove defects and restore gloss.
- Older cars or custom paint jobs may have single-stage paint (no clear coat). These paints are softer and require a light touch and mild polish to avoid removing too much color.
Dark-Colored Cars
- Dark colors (like black, navy, and maroon) show swirl marks more easily.
- Use softer foam pads and finer polish.
- Work in small sections and inspect under direct light to catch defects early.
Light-Colored Cars
- White, silver, and beige cars are more forgiving.
- Swirl marks are harder to see but can still dull the finish.
- You can use slightly more aggressive pads or compounds if needed.
Matte or Satin Finishes
- Never polish matte or satin finishes. These surfaces are not meant to be glossy.
- Polishing can damage or ruin the flat look.
- Instead, clean with a matte-safe cleaner and protect using matte sealants or coatings.
Knowing your paint type helps you choose the right approach, reduce risks, and get the best possible result.
When and How Often Should You Polish a Car?
Polishing your car can make it look great, but doing it too often can cause damage. So, how do you know when it’s the right time to polish?
There’s no single rule for every car. How often you should polish depends on a few things, such as your local weather, how often you drive, where you park, and how old the paint is.
If your car is often exposed to strong sunlight, rain, or dust, the paint can wear down faster. In that case, polishing once or twice a year is usually enough. If you drive in cleaner, milder conditions, once every 18 to 24 months may be fine.
It’s also important to ask: How many times can you polish a car? The answer depends on the condition of the clear coat. Each time you polish, a small amount of this top layer is removed. If the clear coat becomes too thin, it cannot protect the paint underneath. That’s why polishing should be done only when needed.
You should also wait before polishing a freshly painted car. New paint needs time to cure, or harden. It’s best to wait at least 30 to 90 days after painting before you polish.
Choosing the Right Tools and Products
To polish your car properly, you need the right tools and products. Using the wrong ones can lead to poor results or even damage your car’s paint. Let’s go over what you should use and how to choose the best option for your needs.
Hand Polishing vs. Machine Polishing
You can polish your car by hand or with a machine. Hand polishing is slower and takes more effort, but it gives you more control. It works well for small areas or light polishing jobs.
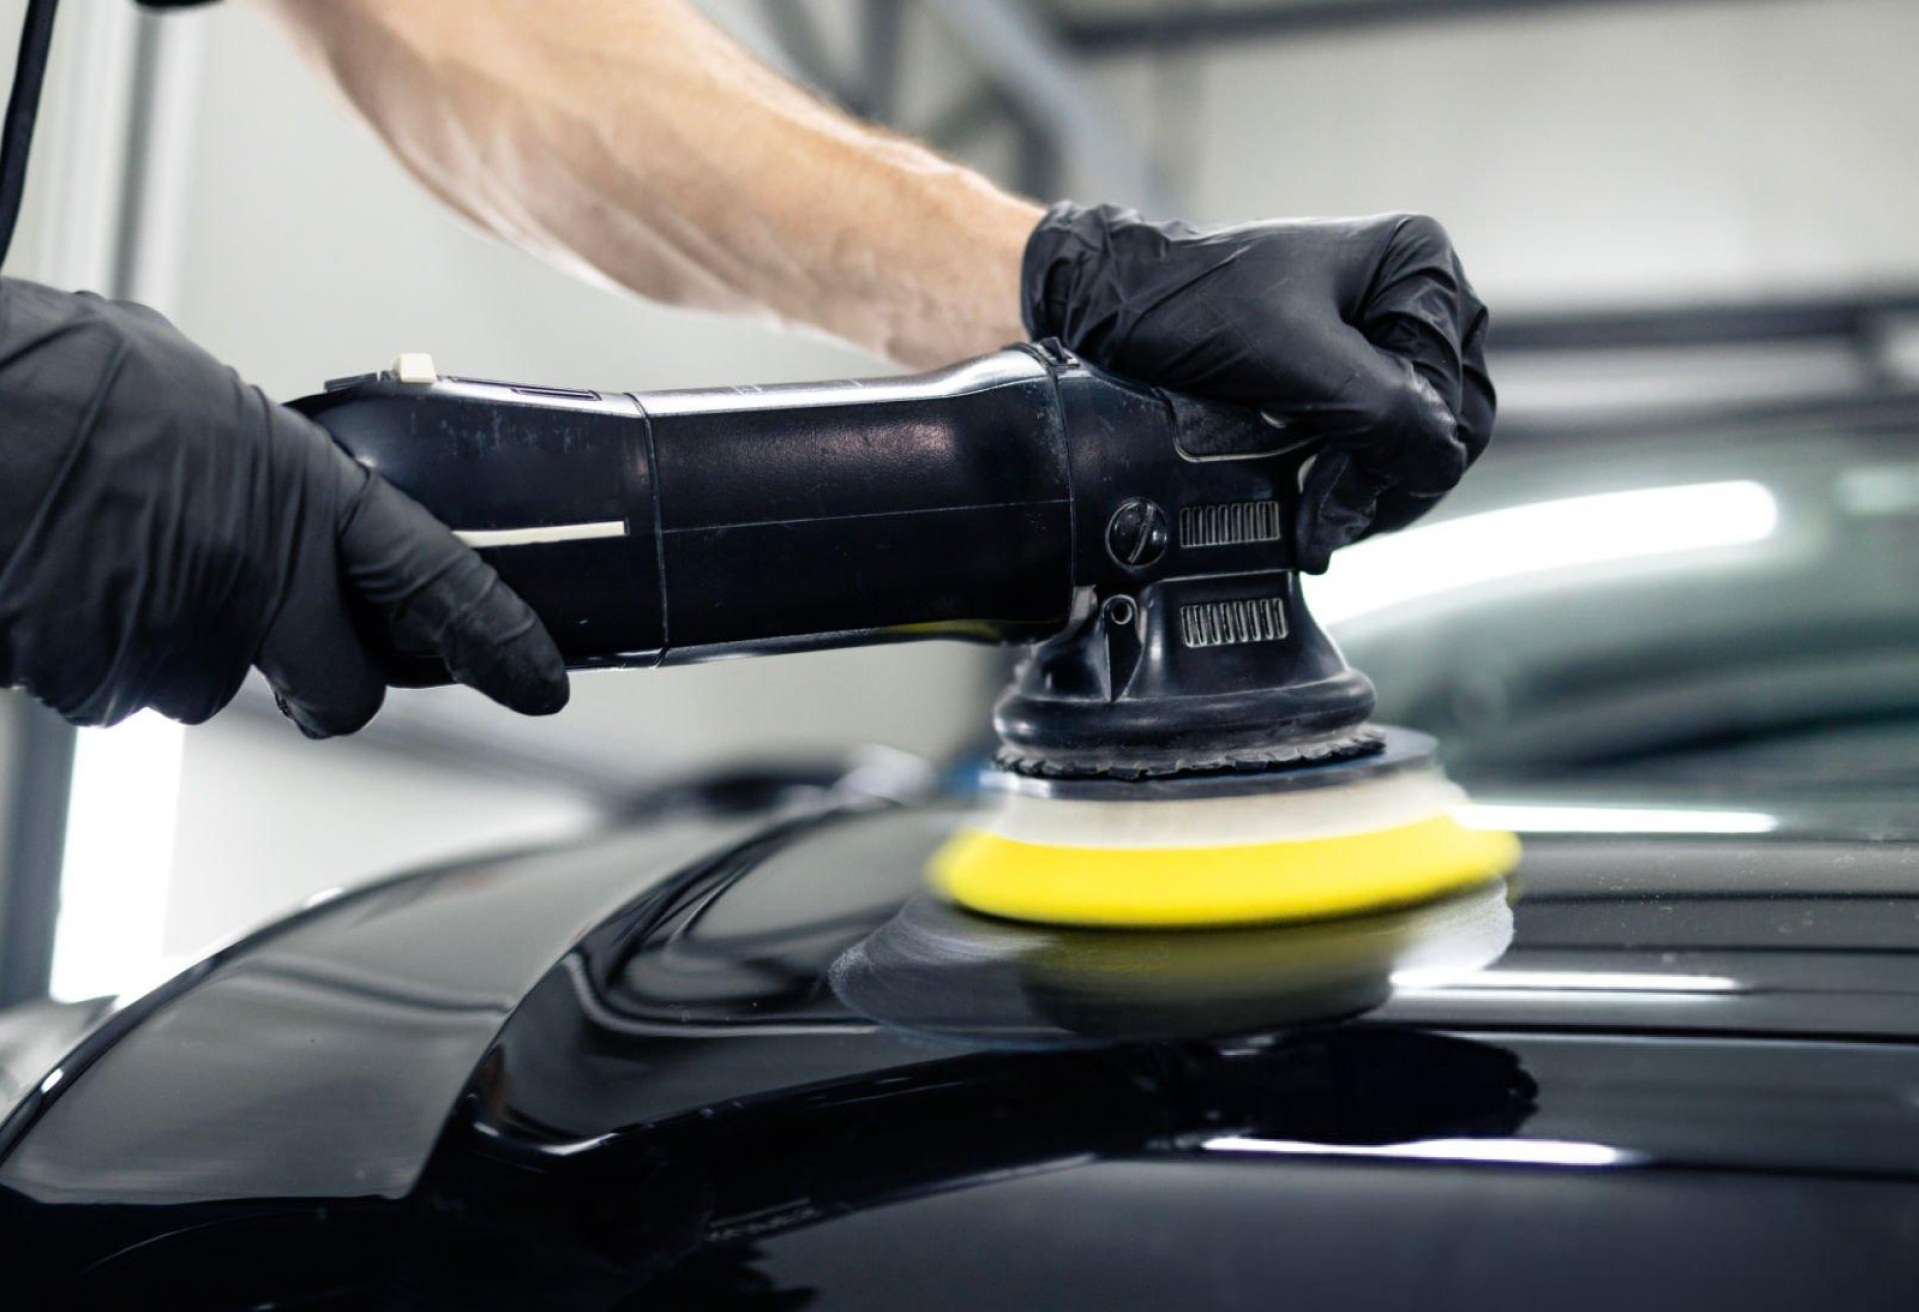
Machine polishing is faster and more powerful. A dual-action polisher is a good choice for beginners because it moves in two directions and reduces the chance of making a mistake. It can handle bigger jobs and deeper scratches more effectively than polishing by hand.
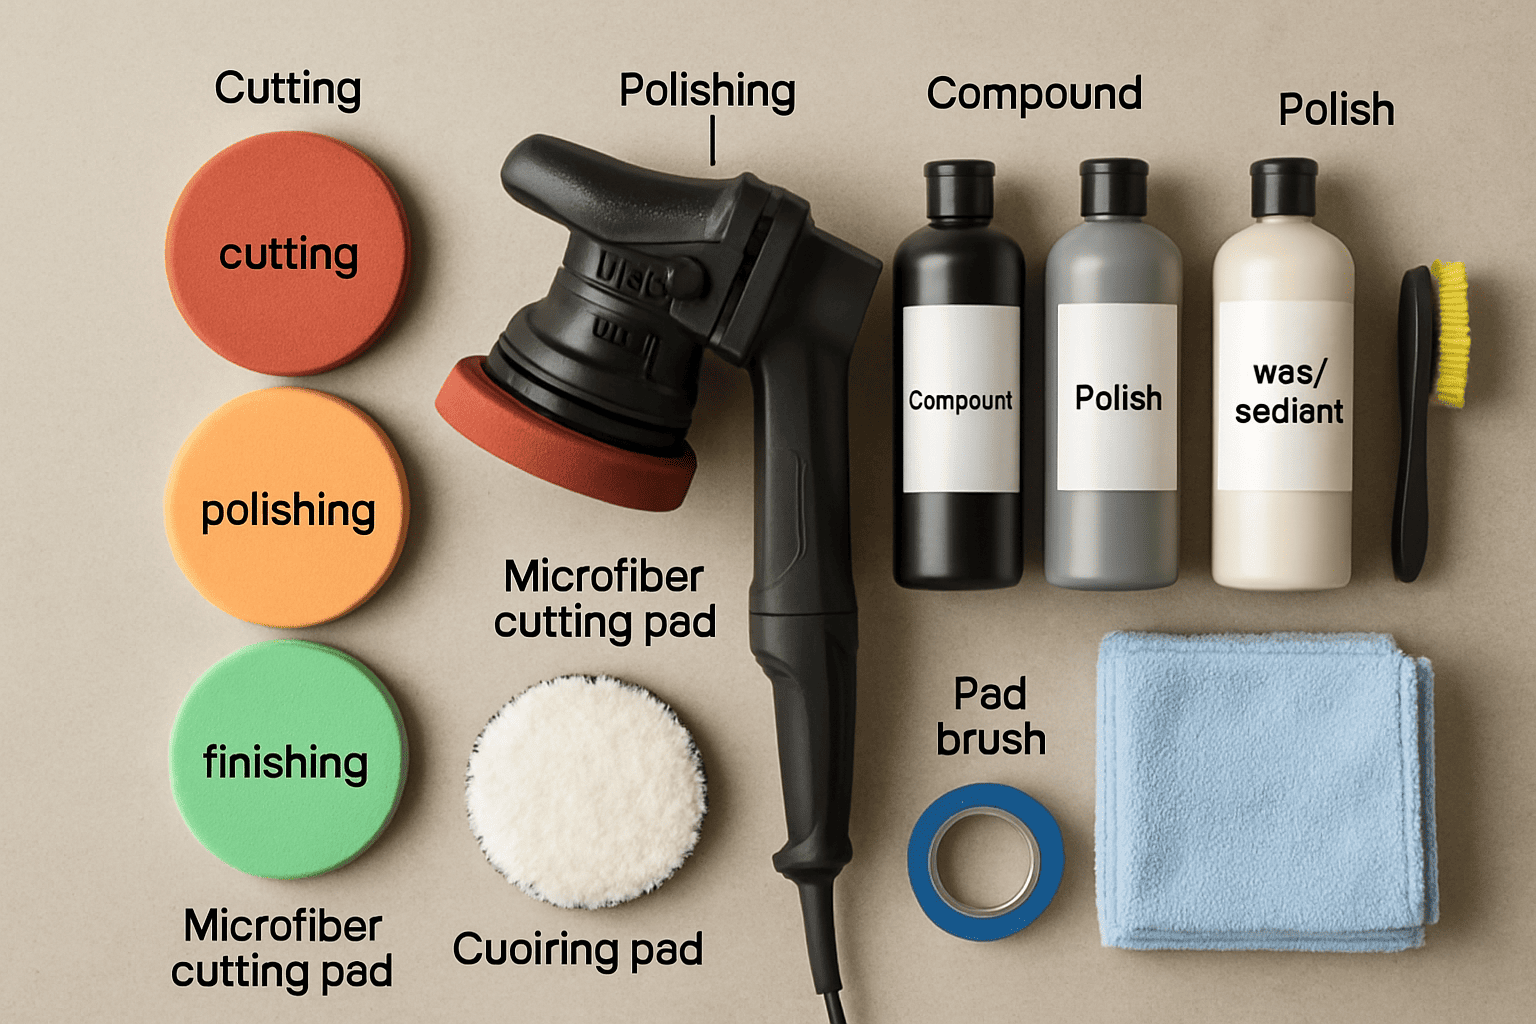
Types of Polishing Pads
Polishing pads come in different materials and levels of softness. You can pair these with tools like theDetail Polisher/Sander, which is compact and beginner-friendly. Foam pads are common and are available in light, medium, and heavy cutting levels. Use soft pads for finishing and harder ones for removing deeper scratches. Microfiber pads are also available and work well with more aggressive polishing products.
It’s important to keep your pads clean. Dirty or clogged pads can scratch the paint instead of fixing it.
Choosing the Right Polish
There are many types of polish. Some are gentle and meant for minor cleaning or shine. Others are stronger and used for fixing deeper marks. If your car’s paint is soft or old, use a mild polish to avoid damage. If the paint is harder or has more visible defects, you may need a stronger polish or even a compound.
Start with the least aggressive product that can still get the job done. This reduces the risk of harming the clear coat.
What About Buffers and Other Tools?
You may hear people talk about buffers, polishers, and compounds. A buffer is another word for a machine polisher. If you’re choosing between corded and cordless options, this comparison guide can help you understand the pros and cons.
Some are rotary (they spin in one direction) and can be hard to control. Dual-action polishers are safer for beginners. You’ll also need a few microfiber towels to wipe off the polish.
Choosing the right combination of tools and products makes polishing easier, safer, and more effective. In the next section, we’ll walk you through the full step-by-step process.
Step-by-Step Guide: How to Polish a Car
Now that your car is clean and you have the right tools, it’s time to start polishing. Follow these steps to get the best results.
Step 1: Inspect the Paint
Before you begin, look closely at the surface of your car. Check for swirl marks, light scratches, water spots, or dull areas. You can use a bright light or flashlight to help you see better. This inspection will help you decide which areas need more attention and what type of polish to use.
Also, try to figure out how hard or soft your car’s paint is. Softer paint may need a lighter polish, while harder paint might require something stronger. If you’re not sure, always start with a gentle product and pad.
Step 2: Apply the Polish
Put a small amount of polish (about the size of a coin) onto your pad. If you’re using a machine polisher, spread the polish on the panel before turning on the tool. If you’re polishing by hand, apply the polish directly to the surface using a foam or microfiber applicator pad.
Start with one small section at a time. A good example is an area about the size of a door panel. Don’t try to do the whole car at once. Work slowly and evenly.
Step 3: Polish Using Correct Technique
Move the pad in straight, overlapping lines. Use a cross-hatch pattern: first go side to side, then up and down. This helps cover the area evenly. Keep the pressure light to medium, and don’t stay in one spot too long. That can create heat and damage the paint.
If you’re using a machine, set it to a low or medium speed. Let the machine do the work. For more serious paint issues, you might want to learn how to use a Rotationspolierer. to repair scherechesHave you ever noticed dull spots, swirl marks, or small scratches on your car’s paint? These problems are common, especially if you drive often or wash your car with rough sponges. Over time, your car’s paint can lose its shine and start to look worn out. The good news is, polishing your car at home can help you fix this.
In this guide, you will learn how to polish your car step by step. We’ll cover what tools you need, how to prepare your car, and the correct techniques to use. You’ll also understand when to polish, how long it takes, and how to protect the paint afterward.
Polishing your car by yourself can save you money and help your vehicle look almost new again. You don’t need to be a professional. With the right knowledge and a little practice, anyone can do it.
Let’s begin by understanding why polishing your car is important.
Why Polish Your Car?
Polishing your car is more than just making it look shiny. It has many real benefits that help your car’s paint stay in good condition.
First, polishing removes small scratches, swirl marks, and stains that make your car look old or dirty. It smooths the surface of the paint so light reflects better. As a result, your car looks brighter and newer.
Second, polishing helps protect the paint. Most cars have a clear coat on top of the paint. This layer can get damaged over time from sun, dirt, and washing. Polishing removes a very thin part of this damaged layer and makes the surface smooth again. This helps protect the paint underneath.
It’s also important to understand the difference between polishing and waxing. Polishing corrects the paint by removing defects. Waxing does not fix the paint. It only adds a protective layer on top. So, polishing comes first, and waxing should be done after.
However, polishing does have some risks. If you polish too often or use too much pressure, you can wear down the clear coat. This may cause more damage instead of fixing the paint. That’s why it’s important to use the right tools and polish the car the correct way.
In the next section, we’ll go over the basics of polishing and how it works with your car’s paint.
Understanding Car Polishing Basics
Before you start polishing your car, it’s helpful to understand what polishing really means. Many people mix up polishing, buffing, and compounding, but they are not the same.
Polishing is the process of removing very thin layers of the clear coat to get rid of small scratches, swirl marks, and dull spots. It helps smooth the surface so the paint shines again.
Buffing usually means using a machine with a soft pad to spread polish or wax. People sometimes use the word “buffing” when they really mean “polishing,” but buffing can also be done with wax, which does not remove scratches.
Compounding is a stronger version of polishing. It uses a more abrasive product to fix deeper scratches or heavy oxidation. Compounding removes more of the clear coat than regular polish, so it should be used carefully.
Your car’s paint has three main layers: primer, color (base coat), and clear coat. The clear coat is the top layer that gives the paint its shine and protects it. When you polish your car, you are working on this top layer.
There are also a few risks to keep in mind. If you press too hard or polish too often, you could remove too much of the clear coat. This can lead to uneven paint or damage. Dirty or worn-out pads can also scratch the surface. That’s why it’s important to follow safe techniques, which we’ll cover in later sections.
Special Considerations for Different Paint Types and Colors
Not all car paint behaves the same during polishing. Depending on your car’s paint type and color, you may need to adjust your technique or product choice.
Clear Coat vs. Single-Stage Paint
Modern cars typically have a clear coat over the base color. These can be polished gently to remove defects and restore gloss.
Older cars or custom paint jobs may have single-stage paint (no clear coat). These paints are softer and require a light touch and mild polish to avoid removing too much color.
Dark-Colored Cars
Dark colors (like black, navy, and maroon) show swirl marks more easily.
Use softer foam pads and finer polish.
Work in small sections and inspect under direct light to catch defects early.
Light-Colored Cars
White, silver, and beige cars are more forgiving.
Swirl marks are harder to see but can still dull the finish.
You can use slightly more aggressive pads or compounds if needed.
Matte or Satin Finishes
Never polish matte or satin finishes. These surfaces are not meant to be glossy.
Polishing can damage or ruin the flat look.
Instead, clean with a matte-safe cleaner and protect using matte sealants or coatings.
Knowing your paint type helps you choose the right approach, reduce risks, and get the best possible result.
When and How Often Should You Polish a Car?
Polishing your car can make it look great, but doing it too often can cause damage. So, how do you know when it’s the right time to polish?
There’s no single rule for every car. How often you should polish depends on a few things, such as your local weather, how often you drive, where you park, and how old the paint is.
If your car is often exposed to strong sunlight, rain, or dust, the paint can wear down faster. In that case, polishing once or twice a year is usually enough. If you drive in cleaner, milder conditions, once every 18 to 24 months may be fine.
It’s also important to ask: How many times can you polish a car? The answer depends on the condition of the clear coat. Each time you polish, a small amount of this top layer is removed. If the clear coat becomes too thin, it cannot protect the paint underneath. That’s why polishing should be done only when needed.
You should also wait before polishing a freshly painted car. New paint needs time to cure, or harden. It’s best to wait at least 30 to 90 days after painting before you polish.
Choosing the Right Tools and Products
To polish your car properly, you need the right tools and products. Using the wrong ones can lead to poor results or even damage your car’s paint. Let’s go over what you should use and how to choose the best option for your needs.
Hand Polishing vs. Machine Polishing
You can polish your car by hand or with a machine. Hand polishing is slower and takes more effort, but it gives you more control. It works well for small areas or light polishing jobs.
Machine polishing is faster and more powerful. A dual-action polisher is a good choice for beginners because it moves in two directions and reduces the chance of making a mistake. It can handle bigger jobs and deeper scratches more effectively than polishing by hand.
Types of Polishing Pads
Polishing pads come in different materials and levels of softness. You can pair these with tools like theDetail Polisher/Sander, which is compact and beginner-friendly. Foam pads are common and are available in light, medium, and heavy cutting levels. Use soft pads for finishing and harder ones for removing deeper scratches. Microfiber pads are also available and work well with more aggressive polishing products.
It’s important to keep your pads clean. Dirty or clogged pads can scratch the paint instead of fixing it.
Choosing the Right Polish
There are many types of polish. Some are gentle and meant for minor cleaning or shine. Others are stronger and used for fixing deeper marks. If your car’s paint is soft or old, use a mild polish to avoid damage. If the paint is harder or has more visible defects, you may need a stronger polish or even a compound.
Start with the least aggressive product that can still get the job done. This reduces the risk of harming the clear coat.
What About Buffers and Other Tools?
You may hear people talk about buffers, polishers, and compounds. A buffer is another word for a machine polisher. If you’re choosing between corded and cordless options, this comparison guide can help you understand the pros and cons.
Some are rotary (they spin in one direction) and can be hard to control. Dual-action polishers are safer for beginners. You’ll also need a few microfiber towels to wipe off the polish.
Choosing the right combination of tools and products makes polishing easier, safer, and more effective. In the next section, we’ll walk you through the full step-by-step process.
Step-by-Step Guide: How to Polish a Car
Now that your car is clean and you have the right tools, it’s time to start polishing. Follow these steps to get the best results.
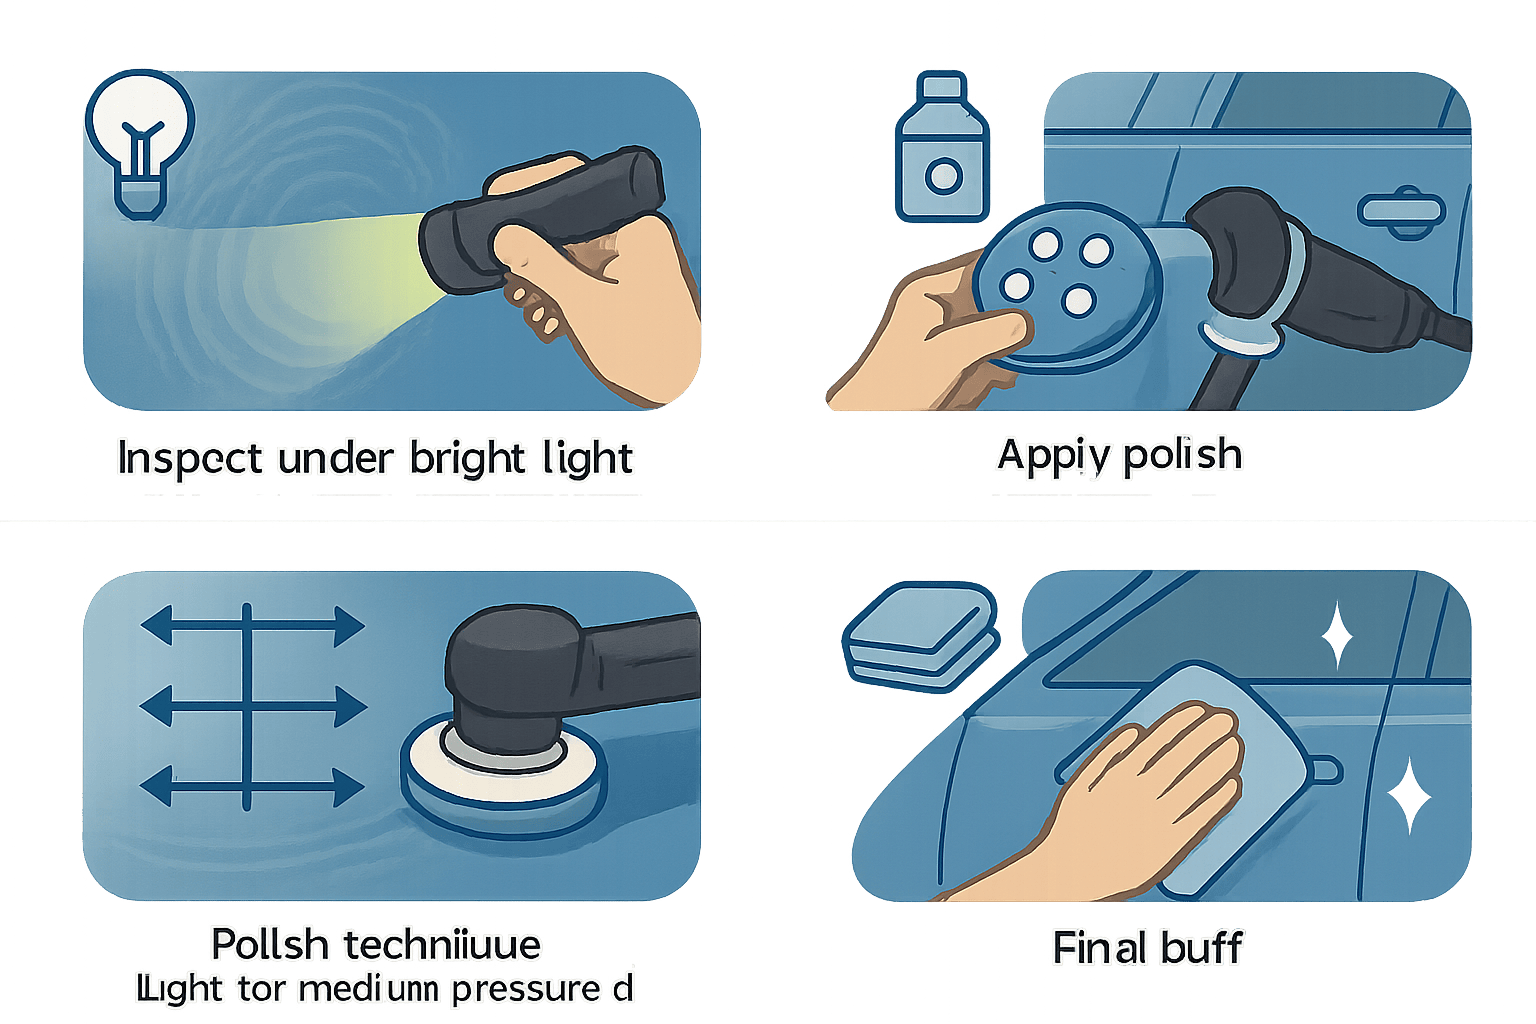
Step 1: Inspect the Paint
Before you begin, look closely at the surface of your car. Check for swirl marks, light scratches, water spots, or dull areas. You can use a bright light or flashlight to help you see better. This inspection will help you decide which areas need more attention and what type of polish to use.
Also, try to figure out how hard or soft your car’s paint is. Softer paint may need a lighter polish, while harder paint might require something stronger. If you’re not sure, always start with a gentle product and pad.
Step 2: Apply the Polish
Put a small amount of polish (about the size of a coin) onto your pad. If you’re using a machine polisher, spread the polish on the panel before turning on the tool. If you’re polishing by hand, apply the polish directly to the surface using a foam or microfiber applicator pad.
Start with one small section at a time. A good example is an area about the size of a door panel. Don’t try to do the whole car at once. Work slowly and evenly.
Step 3: Polish Using Correct Technique
Move the pad in straight, overlapping lines. Use a cross-hatch pattern: first go side to side, then up and down. This helps cover the area evenly. Keep the pressure light to medium, and don’t stay in one spot too long. That can create heat and damage the paint.
If you’re using a machine, set it to a low or medium speed. Let the machine do the work. For more serious paint issues, you might want to learn how to use a Rotationspolierer to repair scraches.
After each section, check the pad. If it looks dirty or clogged, clean it or switch to a fresh one.
Step 4: Final Buff and Shine
When you’re done polishing a section, use a clean microfiber towel to gently wipe off the remaining polish. Check the surface under light to see if it looks smooth and shiny. If needed, repeat the process on areas that still have marks.
Once the whole car is polished, give it a final wipe-down to remove any leftover product.
Troubleshooting Guide: Common Polishing Issues
Even with care, polishing can sometimes lead to issues like swirl marks or hazy finishes. Here’s how to fix the most common problems:
Swirl Marks After Polishing
Cause: Dirty pads, poor technique, or too much pressure
Fix:
- Use clean, soft foam pads. Never reuse dirty ones.
- Apply light, even pressure and move slowly.
- Try a finishing polish with a softer pad to remove fresh swirls.
Hazy or Cloudy Finish
Cause: Product residue, overheating, or incorrect polish
Fix:
- Use a clean microfiber towel to buff the area.
- Reduce speed or pressure on your machine to prevent overheating.
- Use a finishing polish or paint cleanser to restore clarity.
Uneven Gloss
Cause: Inconsistent polishing technique or pad saturation
Fix:
- Keep polishing strokes even and overlapping.
- Avoid overloading the pad. You can clean or replace it as needed.
Polish Difficult to Remove
Cause: Letting polish dry too long or using too much
Fix:
- Work on small sections and wipe off the polish while still slightly damp.
- Use a detailing spray or light mist of water to help remove stubborn residue.
When issues show up, don’t panic. Often, it just takes a minor adjustment in your method or tools to correct the problem.
How Long Does Polishing Take?
The time it takes to polish a car depends on a few things: the size of your car, the condition of the paint, the tools you’re using, and how much experience you have.
If you are polishing by hand, it will take longer. For a small car, it might take 3 to 5 hours. For a larger car or SUV, it could take 6 hours or more. Hand polishing takes more effort and time, especially if the paint has many scratches or dull spots.
If you are using a machine polisher, the process is much faster. You might be able to finish a small car in 1.5 to 3 hours. A larger vehicle may take about 4 to 5 hours. Machine polishing helps you work more quickly and evenly.
Another factor is whether you’re doing a one-step or two-step polish. A one-step polish uses a single product and pad to clean and shine the surface. It’s faster and easier, but may not fix deeper scratches. A two-step process includes compounding first, followed by a finishing polish. This takes more time but gives better results on damaged paint.
If you’re just starting out, plan to take your time. Rushing can lead to mistakes. As you gain experience, you’ll be able to polish more efficiently.
Next, we’ll look at what to do after polishing to protect your hard work.
Post-Polish Protection
After polishing your car, it’s important to protect the fresh, clean surface. Polishing removes small scratches and smooths the paint, but it also takes away part of the clear coat. That’s why adding protection right after is a smart step.
There are a few ways to protect your car’s paint:
Wax
Wax is the most common option. It adds a thin, shiny layer on top of the paint. This layer helps protect against water, dirt, and sunlight. Wax is easy to apply and usually lasts a few weeks to a couple of months.
Paint Sealant
Paint sealant works like wax but lasts longer—usually up to six months. It gives a strong, smooth finish and better protection over time. Some sealants are also easier to apply than others, depending on the brand.
Ceramic Coating
Ceramic coating is the most durable choice. It creates a hard, protective layer that can last for years. It protects against water, heat, dirt, and chemicals. Ceramic coating takes more time and effort to apply, but it gives long-term results.
What Should You Apply First?
Always polish before you add any protection. Polishing removes damage and prepares the surface. Wax, sealant, or ceramic coating should come after polishing. Never do it the other way around, or the polish may remove the protective layer.
Protecting your car after polishing keeps it looking clean and shiny for much longer. In the next section, we’ll share some helpful tips for first-time DIY polishers.
Tips for First-Time DIY Car Polishers
Polishing a car for the first time might seem a little tricky, but don’t worry. With the right approach, you can get great results and avoid common mistakes. Here are some helpful tips to guide you through your first polish job.
Start with a Small Section
Don’t try to polish the entire car all at once. Begin with a small area, like one door or a section of the hood. This gives you a chance to practice your technique and see how the polish works on your car’s paint.
Keep Your Pads Clean
Dirty or clogged pads can scratch the paint instead of fixing it. Clean your pad often while polishing, or switch to a fresh one if it gets too dirty.
Use the Right Amount of Pressure
You don’t need to press hard. Let your hand or the machine do most of the work. Too much pressure can damage the clear coat or leave uneven marks.
Don’t Over-Polish
Polishing too often can wear down the clear coat. Only polish when your car really needs it, such as when you see clear signs of dullness or scratches.
Avoid Polishing Fresh Paint
If your car was recently painted or repaired, wait at least 30 to 90 days before polishing. New paint needs time to cure and harden. Polishing too soon can damage the finish.
Work in the Right Environment
Always polish in a shaded, clean, and dry area. Direct sunlight can make the polish dry too fast, making it harder to remove.
Take Your Time
Rushing through the job can lead to mistakes. Be patient, work carefully, and check your results as you go.
Conclusion: Your Glossy Finish Starts Here
Polishing your car at home may seem like a big job at first, but with the right steps, it’s something you can learn and do yourself. It starts with proper cleaning and preparation. Then, by using the right tools, polish, and technique, you can remove small scratches, smooth the surface, and bring back a glossy shine.
Remember, polishing is not just about looks. It also helps protect your car’s paint and keeps it in better shape over time. Just make sure to polish only when needed, avoid using too much pressure, and always protect the paint afterward with wax, sealant, or ceramic coating.
When done correctly, polishing your car can make a big difference in how it looks and feels. It’s a skill you can improve with time, and it gives you more control over how your car is cared for.
Häufig gestellte Fragen
Can polishing remove car scratches, and how?
Yes, polishing can remove light surface scratches. It works by smoothing out the clear coat and reducing how visible the scratch is. If the scratch is shallow and only in the clear coat, polishing can often make it disappear. But if the scratch is deep and you can feel it with your fingernail, polishing might not be enough. In that case, more advanced repair may be needed.
How do you polish car headlights and the windshield?
To polish headlights, first clean them well. Then use a plastic polish or headlight restoration kit with a soft pad or cloth. Rub in small circles until the surface becomes clear. For windshields, use a glass polish made for automotive glass. Work in small sections and use a microfiber cloth or a special polishing pad. Never use regular car polish on glass or plastic, as it can cause damage.
How much does it cost to polish a car?
If you polish the car yourself, it costs on average around $50–$150, depending on the tools and products you use. Professional polishing services typically charge $150–$300, and full detailing or multi-step paint correction packages can range from $200 to $500+, depending on size and condition. Prices vary by location and service level.