
3D printing is a revolutionizing process adopted by both hobbyists and industries. Where hobbyists play with 3D printing for crafting figurines, sculptures, and many fun elements, industries use it to develop complex mechanical parts. In short, 3D printing has completely changed the way we create, manufacture, or prototype anything before getting them into actual production. But do you know that freshly printed items are not actually ready to use? There are many rough textures, visible layers, leftover support, and much more that need some extra work. That’s where 3D printing post processing comes in.
In the beginning, the rough 3D printed objects require some steps to turn into polished versions that look professional and ready to use. There’s a whole process behind turning these rough prints into usable, durable products. Understanding the post processing of 3D prints is essential for both fun display elements and professional functional parts. Hence, we are here to teach you how to post process 3D prints, so you can turn your rough prints into masterpieces with professional-grade tools.
What Is 3D Print Post Processing?
Before we get into the steps of post processing, you must understand what 3D print post processing is. This process is basically a multistep finishing technique to improve the final product in appearance, texture, and functionality.
Post processing not only enhances the look of 3D printed objects but also makes them more durable. This crucial step is essential to improve the mechanical properties, assembly, painting, and even for industrial use.
Steps for Post-Processing of 3D Printing
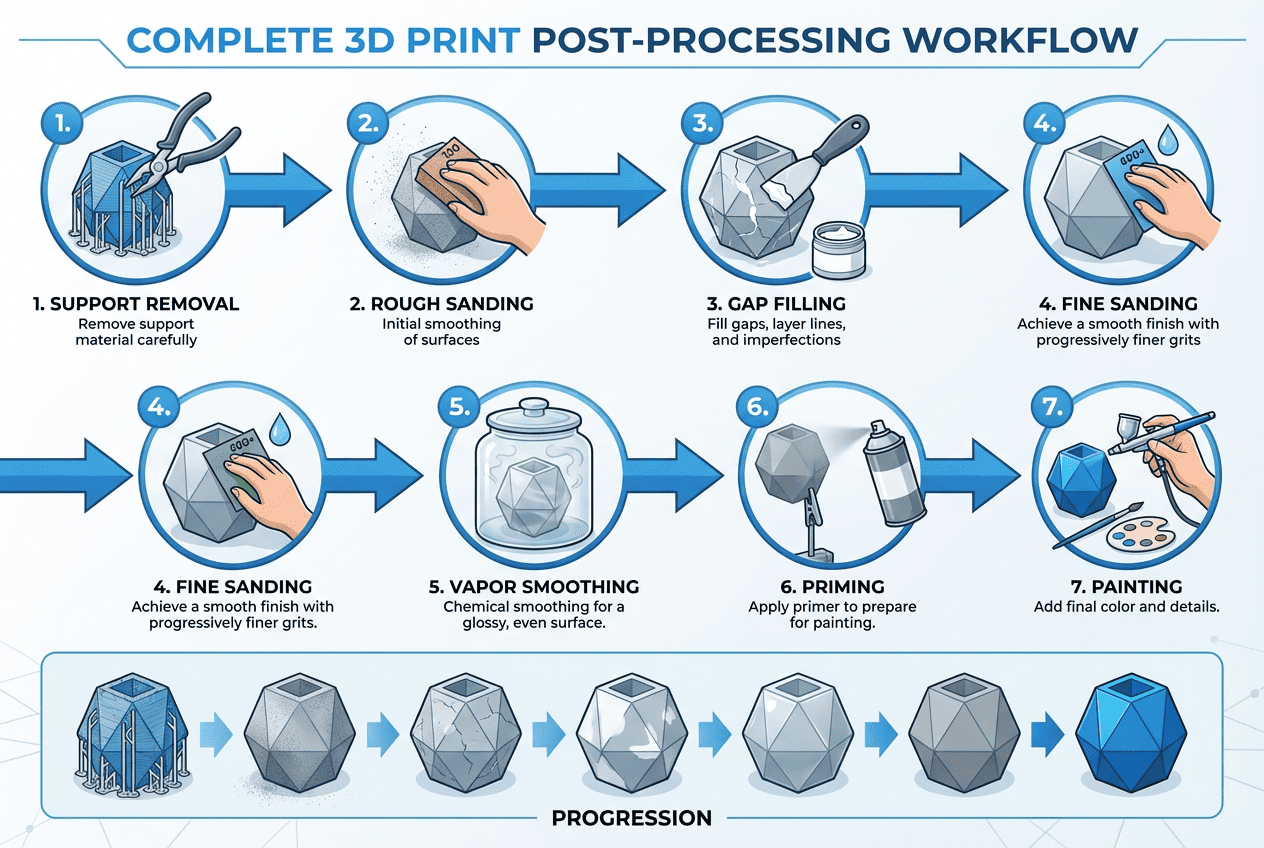
Now that you’ve got a general sense of what 3D print post processing is, let’s learn how to complete 3D prints. Post-processing is a crucial phase in Fused Deposition Modeling (FDM) 3D printing that transforms freshly printed items into smooth, visually appealing, and functional final products. It involves a series of refinements that help eliminate layer lines, fix imperfections, and enhance durability. Here’s a step-by-step breakdown to help you turn rough prints into professional-grade pieces:
Support Removal
Start by identifying all support structures. Gently wiggle and pull them away using needle-nose pliers, working from the edges inward. For tight or delicate areas, use a hobby knife to carefully slice through contact points. Avoid using excessive force, as this can cause surface tearing or even snap off fine features. If supports are fused too tightly, lightly heating them with a heat gun can soften the plastic and ease removal.
Rough Sanding
Next is dry sanding the entire print with coarse grit sandpaper (100–200 grit) to knock down high spots and major ridges. Use a sanding block for flat surfaces to maintain uniformity and prevent uneven wear. For corners or grooves, switch to a small rotary tool or manually fold the sandpaper to fit. Always sand in a circular motion to avoid linear scratch marks.
Gap Filling
Inspect the print for any pinholes, seams between joined parts, or uneven areas. Knead epoxy putty until uniformly mixed and apply it using a spatula. Push filler into gaps firmly, overfilling slightly to allow for sanding later. Use a water-dampened finger to smooth putty immediately after application and reduce sanding effort later. Allow it to cure as per product instructions, usually 30 minutes to 1 hour. Once hardened, sand the filled area with 200–400 grit sandpaper to blend it with the rest of the surface.
Fine Sanding
Once the filled areas are fully dry and rough sanding is complete, switch to finer grit papers. Wet sanding with water reduces dust and gives a smoother finish. Progressively move from 400 to 1000 grit, wiping the surface between stages. Use an orbital sander for broad areas like industrial pieces or props to save time and ensure uniformity. For small or curved sections, use folded sandpaper and sand by hand.
Vapor Smoothing (For Specific Materials)
Vapor smoothing uses acetone to melt the outer layer of a 3D print, creating a smooth, glossy finish. It works best on standard ABS but may not be suitable for ABS+, ABS-PC blends, or flame-retardant ABS due to varying chemical compositions. To perform the process, place acetone-soaked paper towels inside a sealed container and suspend the print above them, without direct contact. Let the vapors act for 10 to 30 minutes, then air-dry the print for 12 to 24 hours. Always work in a well-ventilated space and wear proper safety gear, as acetone is highly flammable and toxic when inhaled.
Priming
Priming comes after filling and gets the surface ready for paint 3D prints. Utilize a spray primer made for plastic materials for best adhesion. Shake the primer can thoroughly and spray in thin, sweeping motions about 6–12 inches from the model. Apply 2–3 light coats, allowing each coat to dry before applying the next. Priming helps reveal scratches or missed gaps. If any flaws appear, sand or fill again before moving to paint.
Painting and Coloring
Painting 3D prints brings your bare product to life. Once primed, apply base paint in light, even coats using an airbrush or spray paint. Allow each coat to dry completely (usually 15–30 minutes). For detailing, use small brushes and masking tape to protect adjacent areas. Once satisfied with the color and design, seal your work with a topcoat to protect the paint and add the desired finish (glossy, matte, etc.).
Safety Precautions for Post Processing
Safety comes first at all levels of post processing:
- Ventilation is required, especially in the case of solvents or sprays.
- Wear protective equipment, including gloves, goggles, and face masks.
- Use the right equipment since the wrong use of blades or sanders can cause injury.
- Keep work surfaces clean to reduce fire hazard and respiratory exposure to dust or fumes.
Comparison of Different Materials for Post Processing
When it comes to 3D printing, the choice of material greatly influences how easy or complex the post-processing steps will be. Each material reacts differently to sanding, painting, and other finishing techniques. The table below provides a quick comparison of popular 3D printing materials and how they fare during common post-processing methods.

| Malzeme | Zımparalama | Filling | Painting | Vapor Smoothing | Notes |
| PLA | Easy | Easy | Evet | HAYIR | Most common, non-toxic |
| ABS | Moderate | Easy | Evet | Evet | Supports acetone smoothing |
| PETG | Moderate | Moderate | Evet | HAYIR | Can be tricky to sand |
| Resin | Easy | Easy | Evet | HAYIR | Needs UV curing before post-processing |
Essential 3D Print Post Processing Tools
The right 3D print post processing tools can make a huge difference in your work. Here are some tools that can help you in post processing of your 3D prints.
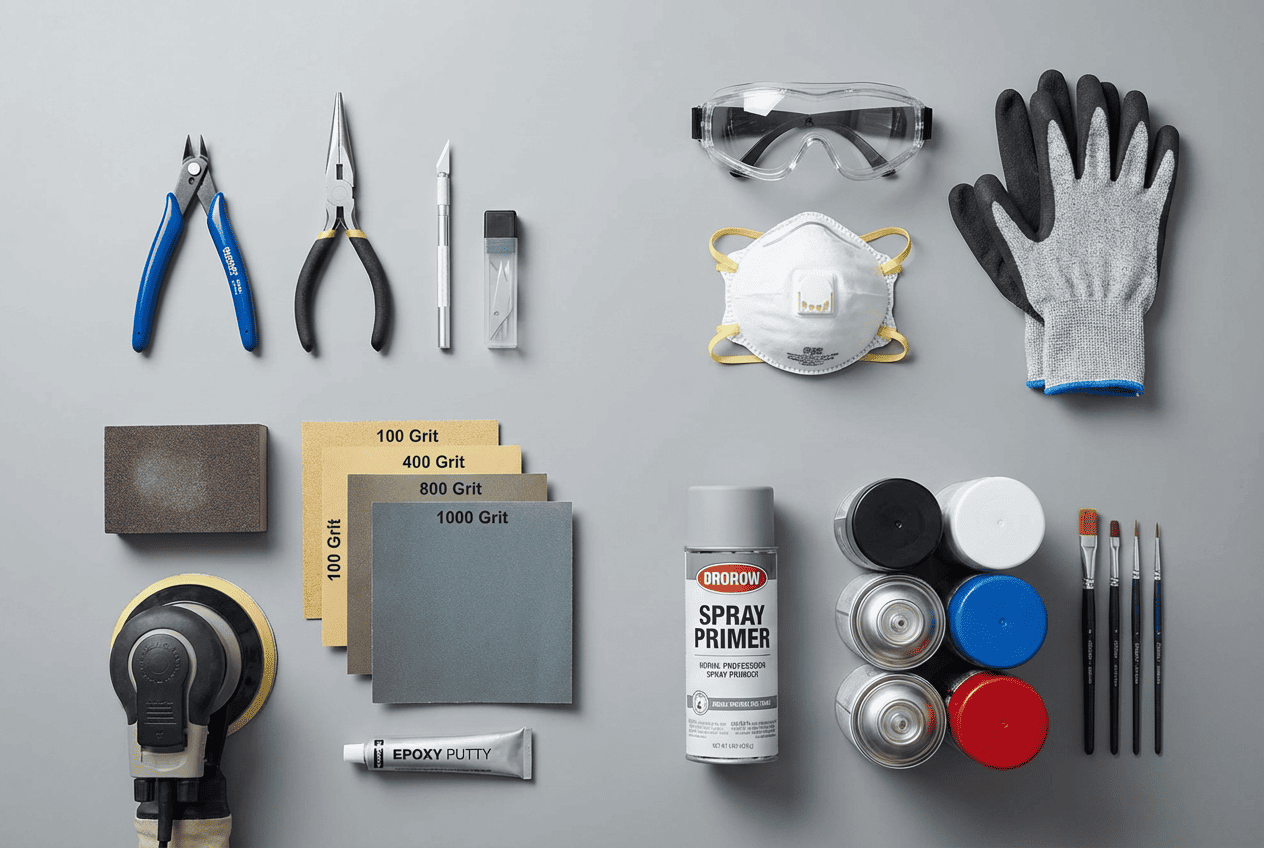
Must-Have Tools:
- Flush cutters – for clean support removal
- Sandpapers (varied grits) – for smooth finishing
- Precision knives – for trimming and detailing
- Fillers & primers – for surface correction
- Spray paint & sealants – for finishing touches
Advanced Tools:
- Orbital sanders – for large surface smoothing
- Dust extractors/vacuum cleaners – keep your workspace clean and safe
These 3D print post processing tools help reduce manual labor, boost consistency, and deliver high-end finishes.
Tips for Effective 3D Printing Post Processing
3D printing post processing is not a step you can take lightly. Proper processing is necessary to boost the performance and visual appeal of the product. Here are some tips for better 3D printing post processing:
- Avoid over-sanding – It can destroy fine details.
- Choose fillers wisely – Some may not bond well with certain materials.
- Apply paint in layers – Rushing leads to drips and smudges.
- Plan ahead – Design with post processing in mind (e.g., minimal supports, part orientation).
Advanced Applications: From Hobbyists to Professionals
Presentation is everything for a business. Professionally post-processed 3D prints help create realistic prototypes for pitches and development, produce stunning marketing models, and deliver final-use parts with a polished, durable finish.
You can check out our B2B solutions to become a dealer. Retailers can bundle different tools used in the 3D print post processing, such as sanders, vacuum cleaners, and other safety equipments to offer packages like “3D Print Post-Processing Packages” for different levels. They can make bundles and packages based on skill level to make things easier for their clients:
- Entry-Level Kits: basic tools like sandpaper, flush cutters, and primer.
- Advanced Kits: include orbital sander, vacuum cleaner, respirator, and filler.
These packages make it easy for customers to get started or upgrade with confidence.
Çözüm
3D print post processing is the crucial finish step that truly transforms your 3D prints. From rough plastic objects, they become masterpieces, be it just fun elements as a hobbyist or complex mechanical parts as prototypes for big industries. With the right steps, tools, and safety practices, anyone can achieve smooth, vibrant, and durable results.
Şu anda MAXXT, we’re here to support every step of your journey, with professional-grade tools and tutorials for every skill level.