If you are planning to repaint your car, there is one thing you need to know: proper surface preparation is crucial and that involves sanding. Whether you need to repair damage caused by a collision, just need to do a touch-up, or want a completely new color, sanding is not optional; it’s fundamental to ensuring a professional-looking paint job.
To sand auto paint is a difficult and messy job, though. You need the right tools, a systematic approach, and loads of patience. This article will lay out in clear terms how to sand and paint a car.
Oto Boyasını Zımparalamanın Önemli Olmasının Nedenleri
Sanding is an essential part of surface preparation for a car painting job. Sanding:
Boyama İçin Mükemmel Bir Temel Oluşturur
Sanding gets rid of old paint and rust spots, creating the right surface for new paint to adhere to. Car paint won’t stick to a poorly prepared surface.
Eşitsizliği Düzeltir
If you are thinking of repainting, your car probably has scratches, dents, and other surface imperfections. Sanding can even these out so you have an even surface to paint.
Boyanın Yapışmasını Sağlar
Sanding creates a surface that is not perfectly smooth like polished glass. It creates a slightly textured surface, the ideal prepping for car paint as paint adheres easily to such a surface. It’s crucial that paint adheres properly otherwise it will be vulnerable to heat and moisture, which might cause it to start peeling.
Yüzeydeki Kir ve Kalıntıları Temizler
The surface for painting must be completely free of substances that can prevent the auto paint from sticking to the surface. Sanding gets rid of substances like car polish, grease, wax, dirt, and dust.
Yüzeyi Astarlama İçin Hazırlar
Before applying paint, you need to apply a primer. The primer seals the metal and protects it against rust. It is also the ideal base for auto paint. Sanding ensures that the primer adheres properly, which is crucial to ensure a perfect final paint finish.
Profesyonel Bir Sonucu Garanti Eder
If the surface preparation is not done properly, it will show up in the paint. Poor surface preparation results in a shoddy result; proper sanding will ensure a professional finish you can be proud of.
Dayanıklılığı Sağlar
Sanding contributes to proper surface preparation, which results in a paint job that lasts long and doesn’t require costly touch-ups.
Doğru Araçları ve Malzemeleri Toplayın
Safety Note: When you sand auto paint, it exposes you to paint dust that might contain traces of lead and other harmful substances. It is essential to work in a well-ventilated area wearing a respirator mask, safety goggles, and gloves.
Arabanızı Boyaya Hazırlamak İçin Gerekli Araçlar
- Sandpaper in different grits
- Zımpara blokları
- Hand sanding pads or sponges
- Dual-action (DA) sander or orbital sander
- Tack cloth
- Painter’s tape and masking sheets
- Body filler (if needed for dents)
- Cleaning solvent or wax remover
Mekanik ve Manuel Zımparalama
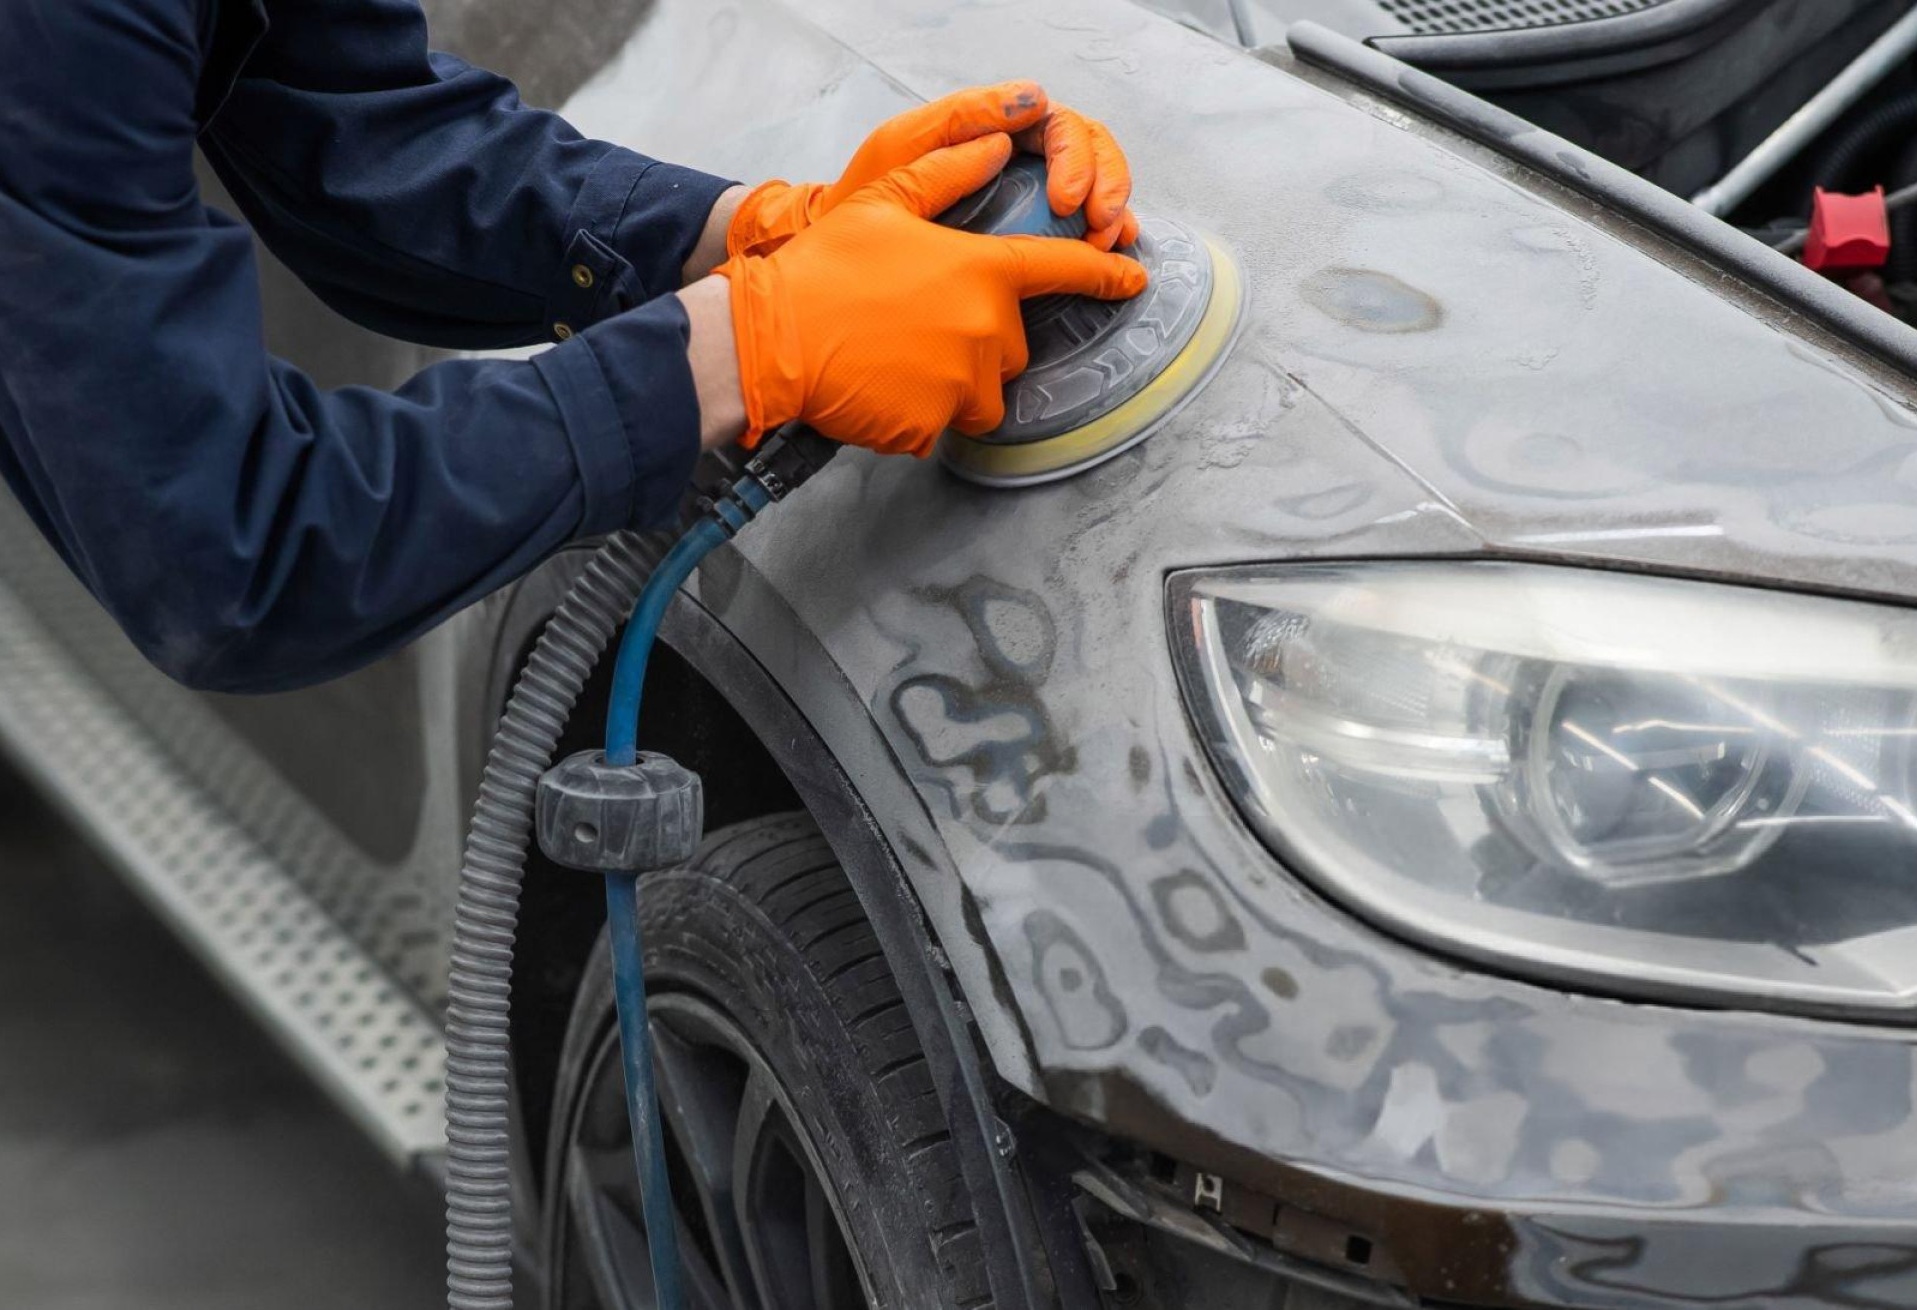
When you sand auto paint, both methods come into play. Manual sanding with sandpaper is more effective for awkward areas where the power tools can’t reach. For flat areas, you can use sanding blocks. Mechanical sanding using power tools, such as orbital sanders, is more suitable for large surface areas. Most auto paint jobs will require a combination of these methods to properly prepare a car for paint.
With manual sanding, you can control the pressure you apply, so it’s less likely to overdo the sanding and cause damage. Using a sanding block helps with the even distribution of pressure. A sanding block is easy to use and an efficient way to sand an area evenly.
Manual sanding is also the preferred technique for tricky areas, such as door trims, window frames, panel edges and smaller areas. A 6″ sanding block works well. For really tight spots, you can simply fold or roll the sandpaper and work with it like that.
Kuru Zımparalama ve Islak Zımparalama
It’s important to distinguish between different sanding methods and to know when to apply them.
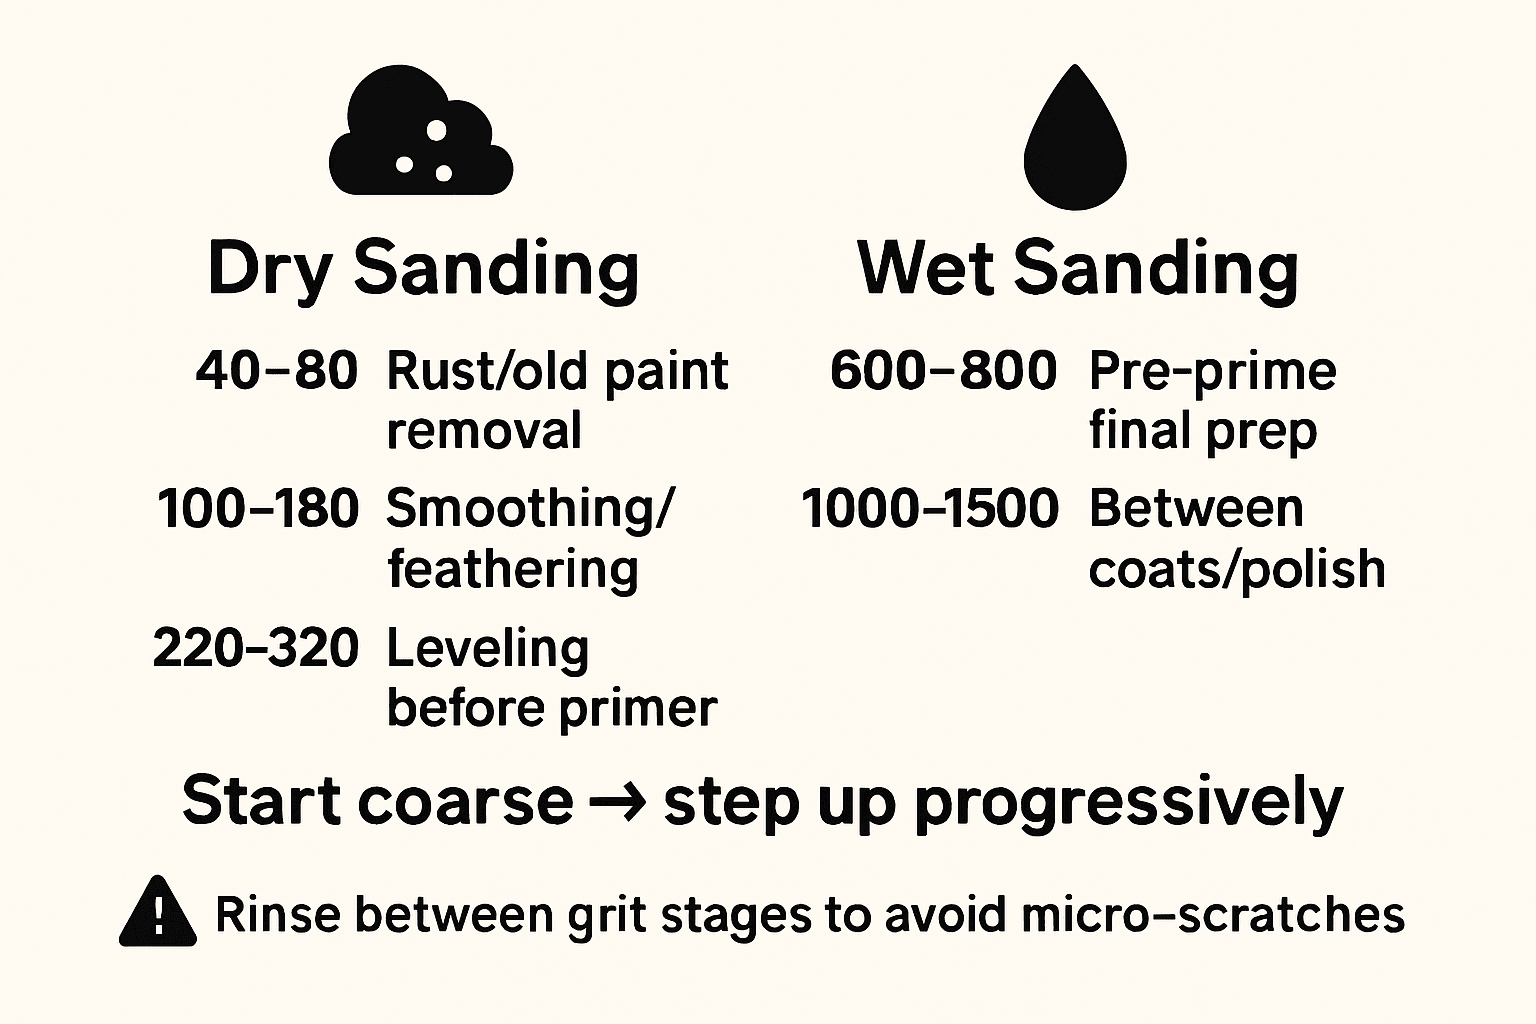
Dry sanding involves using sandpaper without water. This is the usual way to work with sandpaper. It is fast and the preferred method in the initial stages of removing old car paint and rust in preparation for painting a car.
Wet sanding, on the other hand, involves using water with the sandpaper. This is gentler, causing fewer scratches and leaving the surface smooth. Wet sanding is done in the final preparation for car paint. A higher grit sandpaper (800 to 1500 grit) is usually used in wet sanding. Dry sanding uses lower grits (40 to 320 grit).
Doğru Zımpara Kağıdı Kumunu Seçme
When you plan to sand auto paint, it’s essential to understand that sandpaper comes in different grit numbers. The low numbers indicate a coarser grit, and high numbers indicate a finer grit.
- Coarse Grits (40-80) can be used to remove stubborn rust, old paint, and the initial stages of shaping body filler.
- Medium Grits (100-180) are for smoothing rough surfaces and removing remaining minor flaws left after coarse-grit sanding.
- Fine Grits (220-400) get the surface ready for painting, leaving it slightly textured for the paint to adhere to.
- Very Fine Grits (600+) are used in wet sanding to produce a smooth finish.
- Super Fine Grits (1,000 – 1,500) are used for wet sanding between coats or before polishing.
Oto Boya Zımparalama Adımları
Adım 1: Aracı İnceleyin ve Temizleyin
Prepping a car for paint starts with cleaning the vehicle and then inspecting it to establish the extent of the damage.
Clean the surface thoroughly, removing all dirt, oil, wax, and debris. Wash the initial dirt off with soap and water using an automotive soap made for the purpose. Dry off and then inspect the vehicle for signs of rust, dents, scratches, and other damage to establish the areas that need repainting.
Use a water-based, solvent-free auto marker pen to mark the areas that you will be working on. Mask areas that shouldn’t be painted and remove what you can, such as trim, emblems, mirrors, and door handles. This ensures you don’t cover areas with paint unintentionally, which would spoil the end result.
Adım 2: Boyayı Çıkarmak İçin Üç Zımparalama Yöntemi
Dry sanding, wet sanding, and sanding with power tools are all used to prepare a car for repainting. In general, when you sand auto paint, the process is started with dry sanding. Dry sanding is done by hand, which gives you more control over the work.
Dry Sanding
Do dry sanding in the early stages of prep work when you are removing old paint and surface rust. Begin with coarse grits (around 80–120) to strip away damaged paint layers and rust, creating an even surface for repairs. This method is also useful for feathering edges so the old paint and bare metal meet each other gradually, and for accessing places too small and tight for power tools. Power tools are not suitable for detailed work.
Not: Dry sanding generates a lot of dust, so be sure to wear a mask.
Power Tool Sanding
Move on to otomobil aletleri like orbital or dual-action (DA) sanders when larger, flat areas such as doors, fenders, or hoods need sanding. Power sanders speed up the process of removing old paint, smoothing primer, or leveling body filler.
Be cautious when working with power tools – apply even pressure so you don’t gouge the surface. As with dry sanding, it’s essential to work with the appropriate grit for each stage – a coarse grit to begin with and gradually changing to finer grits while working in the direction of the grain. Sand with smooth, overlapping motions and avoid pressing down too firmly.
Start on the flat parts to get a feel for handling the power tool before moving on to more detailed work. Open the doors, trunk, and hood to access all painted areas, and dry sand with 40-grit paper to remove all the paint. For these tight spots and surfaces that are not flat, manual sanding is the best option.
Use the right sanding disk size for the job, such as smaller sanding discs, which offer more control in tight nooks.
Choose the Right Power Tool
Çift Etkili Zımpara Makinesi: Dual-action sanders combine orbital and rotary motion, making them easy for DIY use. A DA sander can be used to strip paint and smooth filler. It’s perfect for use on large auto surfaces.
Yörüngesel Zımpara: Orbital sanders use circular sanding discs, which are less aggressive than a DA sander. It is ideal for light sanding and feathering paint edges, resulting in a smooth surface. Use it for light sanding and feathering paint edges in the finishing stages.
Power Drill with Sanding or Strip Attachments: If you don’t want to buy a sander, and you already own a power drill, you have an excellent multipurpose option to sand auto paint. You can attach wire wheels, abrasive pads, or nylon discs to the drill to remove paint and rust in tight spots or edges, such as door openings.
Wet Sanding
Wet sanding comes last. Once you’ve stripped all the paint off, the finishing touches are done with wet sanding, which removes minor scratches and last imperfections to produce a smooth and even surface for priming.
Adım 3: Yüzey Kusurlarını Onarın
After the first round of sanding, there will probably still be dents, scratches, or gouges that need repairing. Use body filler (such as Bondo) for this purpose. Follow the manufacturer’s instructions for mixing the filler and spread it evenly over the flaws to create an even surface. Once the filler has hardened, sand it down with 180–220 grit sandpaper. Take care to feather the edges so the filled and the surrounding surface blend smoothly.
Adım 4: Yüzeyi Düzleştirin ve Düzleştirin
When all the repairs are done, proceed with sanding the repair area with 220–320 grit sandpaper. Use your power tool for larger areas and dry sanding for areas where your power tool can’t reach. This step will removes minor scratches, integrating the filler smoothly with surrounding areas. Make sure to feather the edges of all the different material layers, including bare metal, primer, and remaining paint.
Adım 5: Son Kuru Zımparalama
Use an orbital or dual-action (DA) sander with a 400–600 grit sanding disc to achieve an ultra-smooth, even surface. Sanding with finer grits is essential to eliminate micro-scratches and prepare the surface for primer.
Keep the sander moving constantly and apply even pressure to avoid swirl marks and prevent gouges. For more detailed or curved areas, professional workshops often use sanding drums to sand auto paint, but manual dry sanding with fine-grit sandpaper is the go-to method for private individuals tackling this kind of project.
Adım 6: Son hazırlık: Islak zımparalama
When you prepare auto paint for refinishing, wet sanding is an essential final step if you are aiming for a professional finish. Wet sanding produces less airborne dust and produces a surface perfect for paint adhesion. Use 600–800 grit sandpaper, keeping the surface wet with a spray bottle. The trick is to not apply too much pressure – you want to create an even surface that is dull for the paint to adhere to. Work with a light touch so you don’t cut through to the layers below.
Performing multiple rounds of dry sanding with progressively finer grits and finishing off with wet sanding, you’ll find you have created a smooth and even surface, which is the basis for a professional priming and repainting job.
7. Adım: Zımparalama Sonrası Geçiş – Boya Hazırlığı İçin Yüzey Temizliği
Now that you have a smooth surface, it’s critical that all traces of dust, filler residue, or sanding particles are removed. All your hard sanding work will come to nothing if the primer gets in touch with any remaining contaminants.
Start by wiping down the surface with a clean microfiber cloth. For areas where you made repairs with filler, double-check that edges are feathered and fully smoothed. Use an automotive-grade cleaning solvent to completely remove contaminants that could hinder paint adhesion.
This step prepares the surface for primer application.
Adım 7: Son Muayene
A pristine surface is a prerequisite for primer and paint adherence and a professional-looking finish. For final inspection you need proper lighting. Light directed directly onto the surface and at different angles, is your ally in spotting hidden imperfections that can spoil the final paint work.
For a high-quality finish you can be proud of, this method is guaranteed to show up any remaining imperfections that you can address before proceeding to the priming stage.
Farklı Boya Türleri için Zımparalama Gereksinimleri
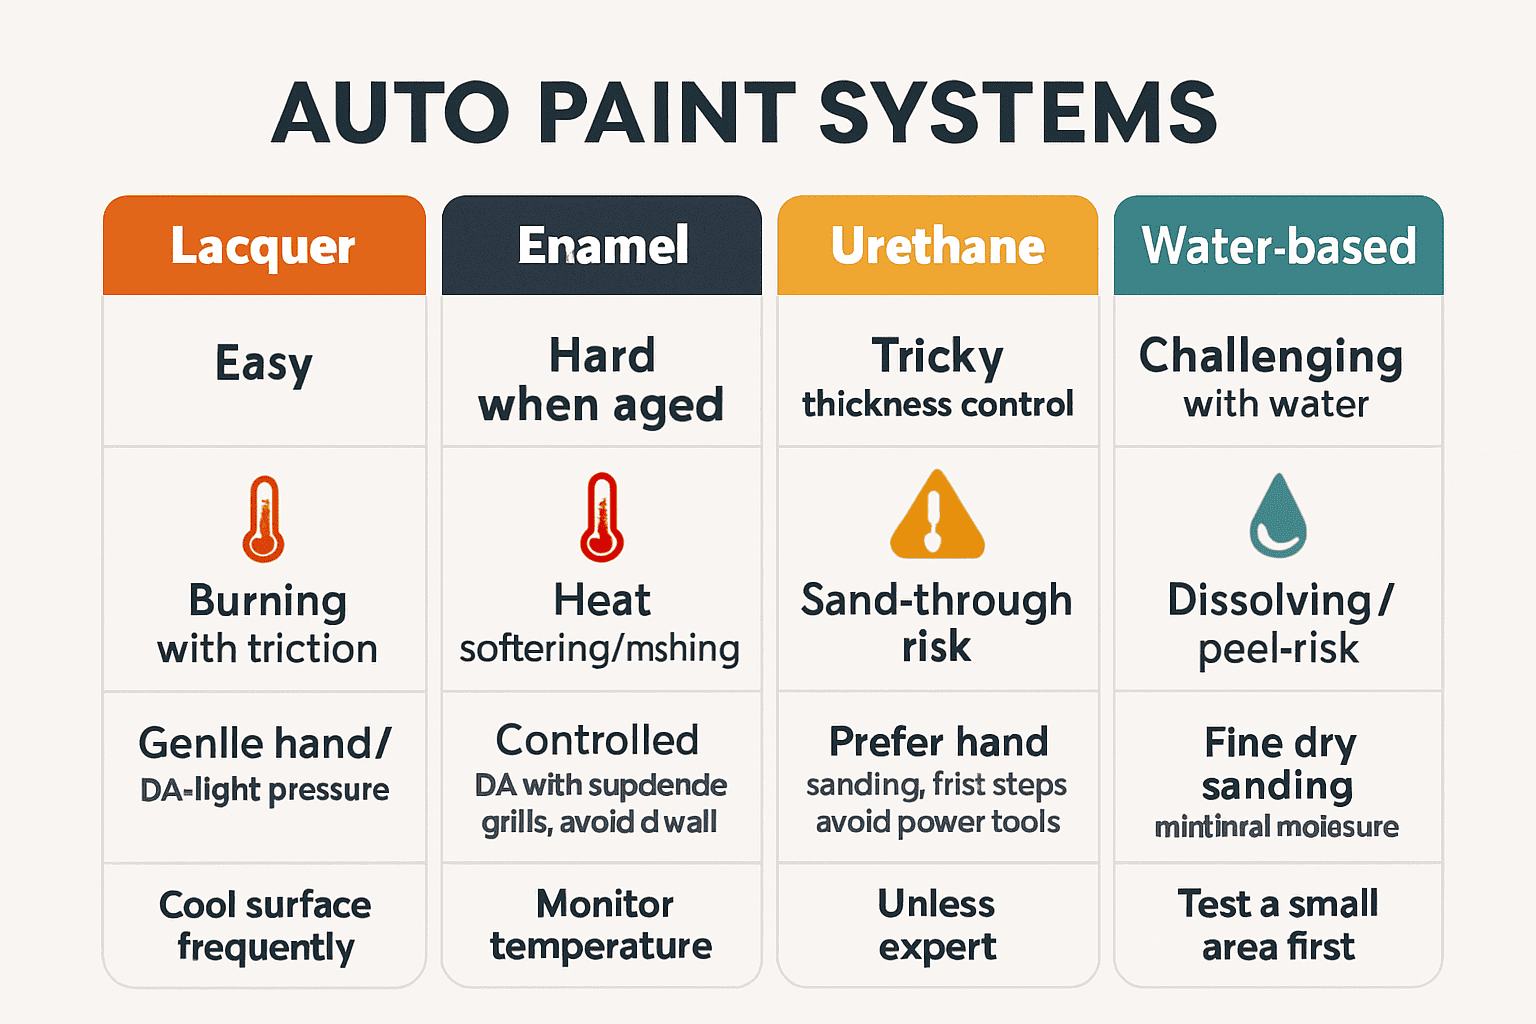
Automotive paints vary from lacquer, enamel, and urethane to water-based paints. Due to their unique characteristics, these paints require different treatment when it comes to sanding them.
- Lacquer is soft, so it’s easy to sand, but it’s therefore also tricky to avoid burning it – too much pressure or friction can easily ruin it.
- Enamel paints become very hard when they age, making them hard to sand, so power tools are often used. However, the friction created by power tools can heat the surface and soften or melt the enamel, so sanding must be done with care.
- Urethane paints are tricky to work with. It’s difficult to judge the depth of the paint when you want to sand it, so you can easily sand through to the primer or metal. Don’t attempt to use a power tool unless you are very experienced.
- Water-based paints are challenging to sand. Although wet sanding is suggested, this method weakens the paint so it dissolves and peels off. The best it to use a fine-grit sandpaper and work carefully.
When considering auto paint sanding steps, determine what paint was used on your car and then consult the manufacturer’s guidelines before sanding. A good strategy is to test a small area to gauge how the paint responds to sanding.
Yaygın Hatalar ve Bunlardan Nasıl Kaçınılır?
Sanding auto paint is delicate work; many things can go wrong and ruin your chances of achieving a professional-looking repaint job. Try to avoid:
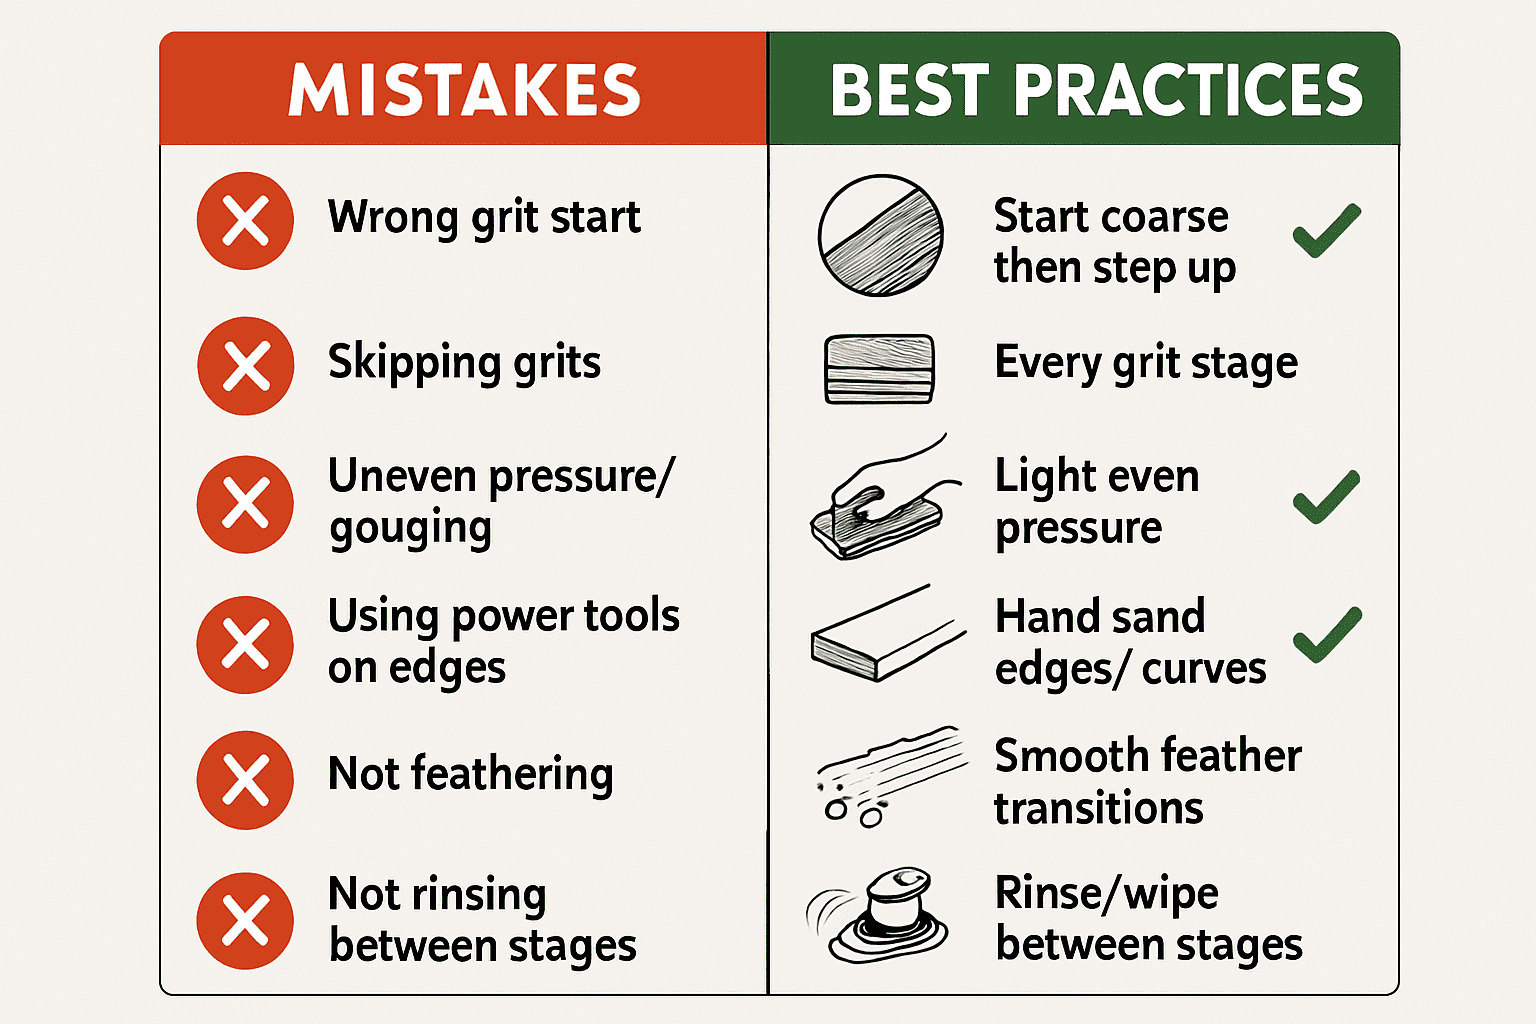
Using the wrong grit – Starting with sandpaper that’s too fine won’t remove defects; starting too coarse can damage the substrate. Always start with a coarse grit and work your way up to a fine grit, finally ending with fine-grit wet sanding.
Skipping grits – Even if the surface looks and feels perfectly smooth after the first sanding round, don’t be fooled. Using progressively finer grits is essential for a smooth finish with no flaws.
Uneven pressure – Using power tools requires skill. Pressing too hard can gouge the surface and burn through layers. Be sure to use even pressure, and if possible, practice on a spare piece of metal first.
Improper tool use – Power tools are not suitable for curves or edges – they are difficult to control in tight areas and can cause gouging.
Not feathering edges – This creates hard lines between different layers that show up once the car is painted.
Not rinsing between stages – If you don’t rinse the surface thoroughly between grit levels, you might cause micro scratches when sanding on micro particles that remained on the surface.
Being impatient – Impatience leads to using pressure to get the job done quickly. You can’t rush prepping a car for paint. Use slow, steady movements to evenly cover the surface avoid burn marks and other damage.
SSS
Can I sand a car by hand without a power sander?
Yes, you can. Just make sure to start with a coarse grit and gradually move onto finer grits. Power sanders are used for large surfaces. If you have the time and patience, you can sand auto paint by hand.
Do I need to sand down to bare metal?
It depends on the damage. If the car paint is very old and has rusted in places, you will need to sand down to the bare metal. If you are only doing minor retouch jobs, that won’t be necessary.
What’s the difference between wet and dry sanding?
Dry sanding uses sandpaper without water and is used to quickly remove paint or smooth a rough surface. Wet sanding uses water to reduce dust. This method creates a smoother finish and is used as the final step before painting.
How do I know when I’ve sanded enough?
You’ve sanded enough when the surface feels smooth to the touch and has a dull, even finish. There should be no sign that you did feathering anywhere.
Can I paint directly over old paint?
No. If you paint directly over old paint, the new paint might not adhere properly and peel off, ruining the chances of a successful repaint job.
Çözüm
When repainting a vehicle, surface preparation is fundamental. You need to know how to sand auto paint. Without proper sanding for car paint, you will end up with a shoddy paint job.
However, be forewarned, surface preparation is a time-intensive undertaking. It requires time, patience, and attention to detail; it is not something you can rush.
To sand auto paint and ensure a repaint job that makes your car look brand new, you need to invest in the right tools and materials and follow a systematic approach, employing the right grit at every stage.
For a professional finish to your surface preparation, MaxXT can provide you with the best sander for auto paint removal. MaxXT is a leading manufacturer and supplier of auto power tools. We can’t stress enough the importance of using professional tools, including auto paint sanders, for a professional finish.
Whether you are an amateur renovator, work for a professional auto workshop, or are a distributor of power tools, MaxXT is at your service. Contact our offices today discover how we can help you reach your goals.